MDM & GP Tips Blog

Jan 2011
16

Lockdown PCs -- Hard. With Windows 7 - - Easy.

The Lockdown Question

Hey Jeremy, what's the best way to lock down my Windows machines? I hear this question dozens of times a year from students who are sitting down at the first day of my Group Policy training workshops. They are often very eager to get right down to business and wrestle this particular problem to the ground because they know that when they go back to their offices and implement what they're about to learn, that their environment will be more predictable and more secure.

See, I know we all feel it would be best if our pesky users would just stop playing with stuff within Windows, their applications and on their desktops.

And, sure, that's part of the art of desktop lockdown. But my suggestion would be to look at desktop lockdown from a holistic and incremental approach. There's no one best way to lock down your Windows machines.

But what is true, is that the technologies built-in to Windows 7 have enabled more control than ever and enabled a wide variety of situations. Lets explore some of my favorite ways to get started with desktop lockdown, then I'll give you some tips on how to expand your controls as you need to.

Lead with Group Policy and Group Policy Preferences

This pair of technologies is arguably the most powerful arrow in your quiver. But using Group Policy, you can restrict a user from some of Windows most tempting locations such as the control panel, desktop, Start Menu, Task Bar and more. Once a GPO is created, most of these settings are found within the User Configuration | Administrative Templates section. There are way too many settings to review here, but I would encourage you to poke around, take stock of the ones that are most interesting to you then try them out in your test lab — before rolling out into production.

When performing lockdown tests, I would suggest that you use two people, a designer and a tester. The Designer should set up the Group Policy settings and lockdown tests, then the Tester would validate the tests and try to wiggle around the designers intentions. Using two people during testing ensures good feedback. One person always validates the other.

As you're working through your resting, do note that some policy settings are reliant upon other policy settings being enabled or other conditions being set or present on the client machine before you actually see the result you're expecting. So again, having a Designer design and a Tester test helps make sure the settings you want to achieve have actually occurred on the client machine.

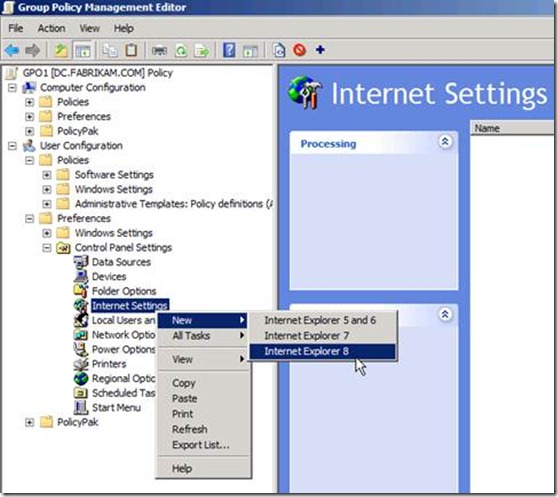
Group Policy Preferences also enables you to deliver desktop settings. Though not specifically designed for desktop lockdown, they can helpful in guiding users away from temptation and toward standardization.
clip_image002

Caption: The Group Policy Preferences can implement IE settings

Sometimes what the doctor ordered is a blend between both Group Policy and Group Policy Preferences. For instance, you might want use Group Policy Preferences to set a particular setting, plus use Group Policy controls to lock down certain areas of IE.

This is an advanced skill, which takes a little practice and patience. But with enough time, you'll find the right balance using the two.

I would also suggest that you check out a favorite document of mine entitled Group Policy Settings for Creating a Steady State which can be found here with literally dozens of ideas to help you get started.

Focus, then Expand

So going back to my students who ask me Hey Jeremy, what's the best way to lock down my Windows machines? As you can tell, I love to lead with the core lockdown starting with Group Policy and Group Policy Preferences, then expand outward using additional Windows 7 technologies.

If you're looking for more hard-core controls, you might want to consider checking out this the recently published document from Microsoft entitled Creating a Steady State by Using Microsoft Technologies.

Inside you'll discover some extra ideas you can try out, such as mandatory profiles, working with AppLocker to prevent applications from running, and even wiping back the hard drive of a machine every night!

We've just scratched the surface. For additional specific tips and tricks on desktop lockdown, it's a common feature in my GPanswers.com Tip of the Week. You can sign up the free tip of the week at https://www.gpanswers.com/register. You can also get hands-on experience with Group Policy and desktop lockdown in my in-person or online-based Group Policy Master Class at www.GPanswers.com/training.

BIO:

Jeremy Moskowitz, GPanswers.com and PolicyPak.com

Jeremy Moskowitz is a Enterprise Mobility MVP, the Chief Propeller-Head for GPanswers.com and Founder of PolicyPak, which makes software to increase desktop lockdown using Group Policy. Thousands of IT professionals have taken his Group Policy training. GPanswers.com was ranked as one of “The 20 most useful Microsoft sites for IT professionals” by ComputerWorld magazine. Jeremy is also a STEP member.

Dec 2010
24

Backup Procedures so Easy, Even Your Mom Could (and should) do it. (Repost, with updates)

Presenting.. “Jeremy Moskowitz’s guide to how to backup your computer (which should be enough for most mere mortals who are not IT pros.)

If you ARE an IT pro, I would encourage you to PRINT and hand-deliver this to everyone during your Xmas or NY-eve party. It may seem like a weird gift NOW, but your friends and family will thank you that you took a moment to set them up with the protection they need.

In a departure of my usual IT-focused subject matter on GPanswers.com, this guide is not specifically geared toward IT managers or even IT pros. Again, this is a guide that you should give to anyone and everyone you know with a computer.

IT backup and restore procedures will be significantly different than this.

This is for “regular Joe and Jane” with one, two or maybe three computers in the house. I wrote this document up after I saw this picture (See below). In short, you never know what is going to happen to your data.There are *EIGHT* things you need to do to keep absolutely safe. Omitting any of these steps is not advised, but I can see if you only performed just ONE, you would still be BETTER OFF than almost most everyone I know. Doing all seven is a near guarantee you will not be “up the creek when the water really hits.”

The Motto I live by: “There are people who back up their data, and those who will.” That’s because DISK DRIVES ALWAYS FAIL. ALWAYS. It’s is a guarantee.  Even the newest ones with no moving parts. They all fail. Eventually. Read more to discover how “mere mortals” (not IT folks) should be backing up their data to prevent disaster.

Look at this picture. Ow. You never know what’s going to happen.

I know.. You’re thinking “Holy cow, Moskowitz. Really? Seven things I gotta do? You’ve got to be kidding me.”

Sorry. Yes. One method isn’t enough. Two *CAN* be enough. But you cannot count that any ONE method will always work.

That’s why you need at LEAST TWO. And the others are GOOD IDEAS.

Let me explain how I do it, and you can copy or otherwise parrot what I do. Or not. For the record, I haven’t lost any data since 1994, your mileage may vary.

Thing #1: Get an online backup service.

What is an online backup service?

It’s a little application that runs on your PC or Mac and constantly backs up your files to the online service thru the Intertubes. I use Carbonite.com (don’t sign up until you read this whole thing.) Others seem to like Mozy.com.

Q:How does it protect you:
A:You tell it where your “data” is.. (or let it decide) and if you DELETE a file, or a directory, you go online and RESTORE it.

Q: What happens if I blow away my whole hard drive or change hard drives
A: You can get it all back.. your data. Pictures, docs, etc. Not applications. You can transfer your subscription to other computers at the same time.

Q: What about applications I’ve installed:
A: You should have another copy of these somewhere. At least a LIST of what’s important, offline, somewhere. See my answer a little later.

Q: What about if I overwrite a file by accident
A: Carbonite says they keep 3 months of backups of a file. Never used it.

Q: What does it cost:
A: $55 a year for “all you can eat.” Multi-year discounts. Get it. It’s a freekin’ no-brainer. $55 a year per computer.. GIGS of storage. They do not monitor storage usage unless it's clearly over-the-top, crazypants Gigabytes.

Q: Mac and PC?
A: Yes. Get it.

Q: Do I need to license each computer in my house?
A: Yes. Do that.

Q: Does it take 90 years to upload all my stuff?
A: Yes. The first time is quite painful for your internet connection. After that, easy.

Q: Are there other backup services like this?
A: Yes, lots. I happen to use this one. Carbonite.com. Others like Mozy.com.

Q: Does it handle open files? If my Outlook is running does it back that up?
A: No. This is a pain in the neck, and you'll occasionally have to just reboot your machine, log on, then go to sleep (leaving the computer on.) Only then will 100% of the files be uploaded to the service.

Q: Is it safe? Do they sell my personal data to the mafia?
A: In the last century, you decided to trust your banks with your money. Now, in the 21st century you have to have some trust in services that hold your data. My stuff is up there as are millions of other peoples. Seems safe. But, make sure, ya know, you're not using a lousy password to access the stuff through their web page.

Thing #2: Get a full-disk backup program

If you’re not using Windows 7, do that soon. Inside Windows 7 is a very decent “Full Disk backup” program. XP has one too, but it’s not quite as good.

In Windows 7, just type “Backup” at the start prompt. The Windows 7 default backup routine is to take a full disk backup. If you ARE an IT Pro reading this, or a home user capable of using the command prompt, my suggested command to run to automate the process is:

wbadmin start backup -backuptarget:O: -include:C: -allcritical -quiet

(Where O: is whatever drive letter houses an external USB disk.) This will ensure that all the Windows 7 important bits are captured and ready to be placed upon the disk. I have found this to be more reliable than the GUI version of the backup tool.

Macs have a built-in excellent program called Time Machine. Check it out, and use it.

If you’re using XP, or even Windows 7, I might suggest something like

http://www.acronis.com/homecomputing/products/trueimage/ (Able to successfully backup and restore to same machine. Have not tried their Universal Restore option.)
or
http://www.symantec.com/norton/ghost (personally, this did not work for me; tried it and didn't get 100% backup, posted to their forums and got lousy responses.)

These products take full SNAPSHOTS of your machine, (and increments) and puts them on an external USB disk (more later). When the crap hits, you boot off a CD (that you make) and .. whamo.. pull from your recovery backup.

Thing #3: Backup to an external USB drive (and back up MOST important stuff here.)

In Step #2, you saved an “image” of your PC somewhere. Where? Here. External USB disks are just DIRT CHEAP.

Here’s 250GB for $39.99. More Googling with yield better results, even.

http://www.tigerdirect.com/applications/searchtools/item-details.asp?EdpNo=18657&csid=_21

Get two or three. See next FAQ for why.

Thing #4: Don’t keep all your backups / computers in your house !

Keep one backup in the house at all times, another at your Mom’s or in the safe deposit box at the bank. True, the bad guys can break in and steal your backup at Mom’s, so a safe deposit box is actually way better.

Why are you doing this “offsite backup?” So, if your house burns down, so does your laptop, -AND- the backup you have in the house. Having another at your Mom’s or in the Safe at the bank is a GOOD IDEA.. But this takes DILLIGENCE.

I know someone who did thing #3 (above) but his laptop *AND* his backup were caught in a flood. If he did Thing #4 as suggested here, he would still have been protected.

So, what do *I* do? Every Monday, I rotate my sets of drives such that I always have TWO in the bank and ONE coming back to me for making a new backup for the next week.

Thing #5: Making DIRECT copies of your most critical data to the external disk drives

If you have EXTRA room after thing #2, then make a DIRECT copy (drag and drop, xcopy, etc) of your MOST IMPORTANT STUFF directly to the external disk drive.

Why? Because if something got CORRUPTED in the snapshot backup of step #2, you at least have YOUR MOST IMPORTANT STUFF as just regular “plain ol’ files” for you to recover.

Just plug in your USB backup and, COPY BACK.

This year, I blew up my humongous .mp3 collection. This became a no brainer for me to repair. I backed up 3 days earlier. I simply deleted all the MP3 on my desktop, and copied the backed up files to their normal home. Boom. Done.

Thing #6: Rotate between AT LEAST two, possibly three USB drives.

This is similar to #4, but three is better than two. This gives me THREE weeks to get something back from the dead if I messed up.

Thing #7: Keep copies of your ORIGINAL disks, downloadables, KEYCODES and Drivers.

I have some key “special” folders in case I need them:

  • Keycodes: c:datakeycodes. It has WORD and TXT files with all the keycodes of everything I’ve ever bought, ever.
  • ISOs: c:ISOs.  This is a collection of the DVDs and CD-ROMs I have physically purchased, including Quickbooks and Microsoft Visio. If you're unfamiliar with how to take your store-bought DVDs and CDs and make ISO files, consider asking your IT friend for a tutorial. This usually requires (free or cheap) software to convert your CDs and DVDs with applications on them to ISO files.
  • Drivers: c:Drivers: This has every driver I would need to get my Laptop and desktops system back going again (sound, video, network, disk, etc.)

This collection is enormously helpful if need to restore them or repair them, or I’m building / re-building a system.

I built a new Windows 7 machine last Thursday and was up and running in 3 hours because I had all my ISOs, keycodes and drivers — all in one place, ready to go.

Thing #8: Test your restore procedure.

This can be really tricky, especially for item #2 (full snapshot backup.)

For laptops, invest in a second hard drive, even if you use it JUST for this test. That’s right. For about $70 or so, you can get, say, this drive:

http://www.newegg.com/Product/Product.aspx?Item=N82E16822148374&cm_re=500GB_laptop_drive-_-22-148-374-_-Product

And then TEST RESTORE from Step #2 onto this drive. MOST laptops can quickly pull out the drive, replace it with this new drive, and allow you to test your restore in full.

Then, when your test is complete, keep using that disk, or swap back to the original. Do this every 3-6 months or so.

For Desktops.. same deal. Get another drive. Get a technical friend to help you if you need to. This procedure IS harder on a desktop than a laptop.

But do TRY to do a similar “full recovery” test. You will be SO GLAD you did this NOW and find problems NOW, as opposed to WHEN the problem occurs and you cannot correct from it anymore.

If you don’t want to do this, at LEAST try to do perform test restores of your DATA from your ONLINE service and your external USB-drive extra-copies

For extra credit, try to recover data from ANOTHER COMPUTER, in case yours becomes a smoldering mess or you drop it in a lake or something.

Other advice:

1. If you do just ONE thing on this list, do #5: copy your most critical stuff to cheap external USB disks. You’re a total fool if you do not at this point because USB disks are so cheap, and they work on Macs and PCs.

2. Its better to do at least ONE of these than NONE of these. I’ve outlined 8 steps here. But if you only want to do one, but do it religiously, it’s better than doing NONE.

3. Don’t count on one method working 100% of the time. That’s why I use three methods and hope ONE of them works when the time comes.

4. Keep it simple. The LESS COMPLICATED you backup and restore procedure is, the better.

5. If all else fails, and you didn’t listen to me AT ALL, and your hard drive dies, and you DON’T KNOW WHAT TO DO Go here:

http://www.ontrackdatarecovery.com/hard-drive-recovery/

For a SMALL FORTUNE, they will open your hard drive and try to recover your data.

It’s not surprising that these companies stay in business. Most people do not back up. Will you pay NOW (cheap backup) or LATER (expensive recovery service that doesn’t always work?)

It’s up to you.

That is all.

Good luck.

Dec 2010
17

Google Chrome-MSI and ADMX files

This is a short and a sweet one. Sort of.

Google has announced an MSI file for deploying their Chrome browser, en-mass to your PCs.

How?

Well, they've got an MSI now. And you can use, say, your favorite software distribution mechanism, like.. oh, gosh, I don't know the in-the-box-and-widely-under-used Group Policy Software Installation ?

Check out the link here.. Now before you DO, I suggest you read onward.

http://www.google.com/apps/intl/en/business/chromebrowser.html

The trick appears to be that, while the MSI is available to anyone, I'm actually NOT SURE if anyone (everyone) is allowed to use it unless they're a Google Chrome for Business company. I clicked on the link to download the MSI, and saw a huge EULA in front of me. I copied and pasted it into Word (take THAT, Google Docs !) and it was a whopping 13 pages and 6,553 words.

Ohkay.

First things first Item 1.3 in the Eula has double-word typo, as in 1.3 Your agreement with Google will also include the the terms I'm not above typos myself, but then again, I don't have 11 billion lawyers working for me.

Next.. I did try to buzz through the document looking for words like Customer and other such stuff to help me learn what the scoop is. But I really can't tell if I'm allowed to use it. Honestly, this isn't my area of expertise, so I don't have direct advice on whether or not it's legal, quasi-legal, or totally illegal to use this MSI if you're not a Google Chrome for Business member. I guess- I could contact Google Sales, and maybe they'll get a hold of me.

But, if you KNOW the answer, then just email me, and I'll post a follow-up.

Part II of this little story is that there's also ADM and ADMX/ADML files as well.  Once you put the ADM, ADMX & ADML files in the right place, you're cookin with gas and configuring Chrome a-go-go.

The link to THAT is here:

http://www.google.com/support/a/bin/answer.py?hlrm=en&answer=187945

Interesting stuff.

That's it for now.

PS: Learn how to deploy MSI files, upgrade them, manage them, patch them, revoke them and more.  Learn how to manage ADM, ADMX and ADML files and not shoot yourself in the foot or blow up your network.

I still have the <bleep>-ing discount going for my GPanswers.com Home Study Course – Silver Kits. Gotta email me for the <bleep>-ing discount code.

Check out my Group Policy training with the Online University here:

https://www.gpanswers.com/training/sign-up-now-online/

Talk soon!

Nov 2010
30

Using Powershell to find Group Policy Strangeness

Do you have any GPOs which are “not doing anything”? If so, why?

If you have zillions of GPOs, here’s a quick cleanup tip.

Use a Windows 7 machine and PowerShell to quickly find all GPOs which have all their settings disabled.

Here's an example GPO with all the settings disabled.

image

Sure, you COULD click on every stinkin GPO you have in your domain.

-OR- you can use Powershell to quickly get to the bottom of things.

1. On a Windows 7 machine, open a command prompt.

2. Type “Powershell” (no quotes.)

3. Type import-module Grouppolicy (no quotes.)

4. Type the command you see here: get-gpo all | sort gpostatus

The ones with AllSettingsDisabled will bubble up to the top.

image

All the Powershell propeller-heads are rolling their eyes right now, because they know there's a cleaner way to produce the output of this showing ONLY the ones that actually match the GpoStatus of AllSettingsDisabled.

Yes, yes, you purists

Here's how to do it:

get-gpo all | where { $_.GPOstatus eq AllSettingsDisabled}

image

Hope this helps you out!

Oct 2010
19

How to use Group Policy to control Services

Guest post by Alan Burchill (Enterprise Mobility MVP) from the Group Policy Center

Services are programs that are configured to run in the background of a Windows computer weather or not there is a users that is logged on. They are essential part of windows and are essential to the operation of any windows computers. Without services computer could not perform automatic updates, run scheduled tasks or even connect to a file share. Therefore the ability to control Windows Services is a vita task for IT administrators.

Quite often disabling services on a computer is the best way to reduce the security surface of a computer or to improve performance by turning off un-used components of the OS. Inversely it is also very important to have the ability to turn on services to enable certain functionality or to ensure that certain services are not turned off.

Below I will go through the two ways you can control services in windows by using Group Policy each ways has its own advantages and/disadvantages but together you can pretty much control any system service the way you want.

In the examples below I am going to show you how to enable the Applications Identification service that is required to be enabled to make AppLocker work in Windows 7.

Using Group Policy to configured a Service

Even since Group Policy was introduced to Windows 2000 you have been able to configured some aspects of services using native group policy.

Now that you can control service using Group Policy Preference there are only two reason that you will still want to use this method.

  1. You want to control services on Windows 2000 or a computer that does not have the client side extensions installed.
  2. You want to configure the security so that non-administrators can start,stop and pause the service.

Step 1. Edit a computer Group Policy Object that is targeted at the computer that you want to configure

Step 2. Select the services that you want to configure.

Note: If the service that you want to configure is not present in the list you will need to install GPMC on a computer that has the service running. This is a painful restriction of controlling services this way and

image

Step 3. From the menu click on Action > Properties then tick Define this policy setting and then configured the service startup mode to what you want it configured.

image

Step 4. If you click on the Edit Security button you can also configured who has control over the service. This would be useful if you want to give end users the ability to start and stop specific services. Tip: Tick Start, stop and pause for INTERACTIVE if you want the logged on user to control the services.

image

Now that you have configured the services via group policy you will need to reboot the computer for the new startup mode to take affect. This means if you are disabling a service then it will not stop until your next reboot which could be may days, weeks or even months after you made the policy change.

Using Group Policy Preferences to configure a Service

The newer and almost always better way to configure service now is to you the Group Policy Preference Services options. As opposed to the native method which only allowed you to control the startup and security of service, preference now allows you much greater control.

The only reasons you would not want to use Group Policy Preference to control services are:

  1. You need to configured the startup mode of a service on a computer running Windows 2000 or one that is not running the client side extensions.
  2. You want to be able to configured the security to allow non-admin to start, stop or pause the service.

Always remember that when you do configure a service startup mode using the native method that this will take precedence over Group Policy Preferences and you can use the security options in conjunction with preferences.

Step 1. Edit a computer Group Policy Object that is targeted to the computers that you want to control the service.

Step 2. Navigate to Computer Configuration > Preferences > Control Panel Settings > Services

image

Step 3. In the menu click on Action > New > Service and now click on the button next to the Service Name field.

Note: From here you can either type in the service name in the Service Name field or click on the button to chose the service from a predefined list of services.

image

Step 4. Select the service name that you want to configured and then click Select

image

Step 5. Now you can configure the Startup mode from the Startup mode drop down box and you can configure a service action.

image

Service Action will take place each time there is a group policy refresh so that you do not need to wait for the computer to reboot for the latest startup mode to take affect. This can also be handy to configure if you want a service to start if it crashes or if you have a pesky service that requires restarting on a regular basis to keep running properly.

Step 6. Click on the Recovery tab to configure the recovery options of the service as you would configure in the service control panel.

image

Step 7. As this is a preference you can also configure the standard Common options from such as item level targeting which will allow you to granularly control what computer you target this setting.

As you can see with the combination of Group Policy Preferences and the native policies there is nothing you cant configure to your system services Enjoy

This post was originally posted here http://www.grouppolicy.biz/2010/08/how-to-use-group-policy-to-control-services/

Oct 2010
18

Office 2010: Group Policy Deployment Bonanza

I’m not exactly sure why.. but sometimes Microsoft goes on a little jag about something. They get a particular bee in their bonnet, then BLAMMO! Tons of stuff on one focused topic comes out, all at once, just overwhelming us.

Well, this kind of just happened recently. And NO, I’m not talking about “Windows 7 Phone Mobile System 7 Mobility Solution for Mobile Phones” … or whatever-the-heck-it’s called.

I’m talking about Office 2010. And, specifically, deploying that big ‘ol beast using Group Policy.

I do cover how to deploy Office 2010 (and Office 2007 for that matter) in my big green book (www.GPanswers.com/book) but it’s also true Microsoft has made some newly available docs which give some extra oomph to dealing with that rollout.

PS: If you’re coming to my Chicago class NEXT WEEK, then GOOD NEWS !    I’ve decided to put my working gloves on, and POOF ! Now, you’ve got a brand new “unannounced” extra bonus lesson with hands-on labs for “Office 2010 + Group Policy = Deployment !” So, see you there. (Two seats left, by the way… https://www.gpanswers.com/training if you want to claim ’em.)

If you can’t make it to Chicago, here’s the “self help” resources I talked about.

() TechNet Magazine Auto Deploy Office 2010 with Free Tools:
http://technet.microsoft.com/en-us/magazine/ff956190.aspx

() Deploy Office 2010 by using Group Policy computer startup scripts
http://technet.microsoft.com/en-us/library/ff602181.aspx

() For IT professionals: Group Policy for Microsoft Office 2010
http://tinyurl.com/23g8txf

() Office 2010 Administrative Template files (ADM, ADMX, ADML) and Office Customization Tool
http://technet.microsoft.com/en-us/library/cc178992.aspx#section8

I do gotta say “Thanks Microsoft.”  Having to slog though without the docs (even, heck.. WITH the docs) out on your own is PAINFUL. Really. But these newer docs do ease that pain a little bit. I know people are hep on trying to roll out Office 2010.. and it isn’t easy.

Hopefully these docs help you make the magic happen. Until next time !

Jeremy Moskowitz
GPanswers.com (Group Policy Community)
PolicyPak.com    (PolicyPak Software)

Oct 2010
10

ADMX Overlap

By now you saw the video related to this blog posting. If you haven’t yet, then STOP, watch this, then come back here:

http://tinyurl.com/admx-overlap-video

Okay. Now that you understand the “ADMX overlap” issue a little more, here’s the EXACT list of files that are exclusive to each operating system. So, if you want to have “100% of it all” be sure to copy up ONE operating system’s ADMX files, then hunt the rest of these down, and also put them in the Central Store.

(For more information on the Central Store, I would suggest my live or GP Online University Training course. Just click Training | Get Training and check it out.) Here’s the list:

Server 2008 R2 “only” ADMX / AXML files:

  • Adfs.admx
  • GroupPolicyPreferences.admx
  • Group Policy-Server.admx
  • Kdc.admx
  • MMCSnapIns2.admx
  • NAPXPQex.admx
  • PowerShellExecutionPolicy.admx
  • PswdSync.admx
  • ServerManager.admx
  • Snis.admx
  • TerminaServer-Server.admx
  • WindowsServer.admx

Windows 7 only ADMX files:

  • DeviceRedirection.admx
  • Sdiagschd.admx
  • Search.admx
Sep 2010
27

Internet Explorer 9 (Beta) Group Policy Settings

IE9-banner2

Guest Post by Alan Burchill (Enterprise Mobility MVP) from the Group Policy Center.

Microsoft has now released to the public the newest version of Internet Explorer 9 Beta to the public. If the new functionality alone is not enough to get you to use it is just remember that it is now a Fully Hardware accelerated which makes it much faster than any other browser on the market!!

With any new version IE there comes new features and with new features comes new group policy settings so below I go through the new policy settings and how you can get started right now with managing IE9 using Group Policy.

To get started you will need to download and install IE9 on whatever computer you are using Group Policy Management Console (a.k.a. GPMC) to edit your Group Policy settings as with anything to do with Group Policy it is normally best to make changes from a systems that has the newest software on it in your organisation.

WARNING: This software is still Beta so you are strongly recommended to isolate any testing you do with IE9 and Group Policy from your production environment.

Internet Explorer 9 Administrative Template Group Policy Settings

There are only 8 new Admin Template group policy setting but remember that just like previous version most of the  other older IE policy settings will still apply to this newer of IE. Theses settings are of course not final and Microsoft could change or added/remove more setting before the product goes RTW.

As IE 9 only supports Windows Vista and Windows 7 you now only get ADMX files for the new policy settings which will automatically get placed into the C:WindowsPolicyDefenitions folder on the computer you install IE9. Note: You will need to upload inetres the ADMX and ADML file to the central store (if you are using a admin template central store.) So once the new ADMX / ADML files are loaded you will be able to configured the new IE setting under Administrative Templates in the Group Policy Editor. Sweet!

To save you the time of trying to find where the new policy settings are yourself I have listed the 8 new Administrative Template settings with the location that they can be found so you can check them out yourself.

Disable add-on performance notification

Administrative Templates > Windows Components > Internet Explorer

image

Turn off Managing SmartScreen Filter

Administrative Templates > Windows Components > Internet Explorer

image

Allow Internet Explorer 8 Shutdown Behaviour

Administrative Templates > Windows Components > Internet Explorer

image

Automatically enable newly installed add-ons

Administrative Templates > Windows Components > Internet Explorer

image

Prevent Deleting Download History

Administrative Templates > Windows Components > Internet Explorer > Delete Browsing History

image

Enable WebM software (when available)

Administrative Templates > Windows Components > Internet Explorer > Advanced Settings > Multimedia

image

Prevent configuration of search from the Address bar

Administrative Templates > Windows Components > Internet Explorer > Advanced Settings > Searching

image

Install binaries signed by MD2 and MD4 signing technologies

Administrative Templates > Windows Components > Internet Explorer > Security Features > Binary Behaviour Security Restrictions

image

Internet Explorer 9 Internet Explorer Maintenance Group Policy

The other way you can configured IE9 with Group policy is by going to Windows Settings > Internet Explorer Maintenance section and as with previous version you can configure you IE setting (e.g. Home Page) or you can Import the current Program and/or Security using the Import Program Setting option.

image

Internet Explorer 9 Group Policy Preferences Group Policy

Umm… err… Unfortunately at this point in time there is no support for Group Policy Preferences with Internet Explorer 9. This may or may not change in the future but at least for now you can use Admin Templates and IE Maintenance mode to keep you going.

As the beta has only just been released then it is highly likely that there will be more information coming soon…

This article was original posted on the Group Policy Center at http://www.grouppolicy.biz/2010/09/internet-explorer-9-beta-group-policy-settings/

Sep 2010
15

GPanswers.com: It's fun to steal (or... The art of search.)

I really can’t take credit for this one. I’m going to just give the shout outs “in advance” to my friends who made this blog entry possible: Alex Verboon, Alan Burchill GP MVP, Darren Mar-Elia GP MVP, Mark Heitbrink GP MVP and the Group Policy Team itself.

Okay, with that out of the way, here’s “Jeremy’s 100% ripped-off guide to searching for stuff in Group Policy.”

Item 1: Online Group Policy Search
——

There’s a new “online” ability to search for Group Policy settings and items. It’s DUN-DUN-DUN… “In the cloud!” Aiighh.. Run for your life !! Okay, not really. It’s just a web page. Go to this address, and start searching for new Group Policy settings you didn’t know existed:

http://gps.cloudapp.net/

Item 1B: Online Group Policy Search, now inside Explorer
——————————————————–

I first came across this tip in a post from Alex Verboon. I’m not sure if Alan Burchill, Enterprise Mobility MVP had the same idea at the same time, or what, but they both discovered how you can link that “cloud app” to Windows 7 Explorer’s search. So, you can search for Group Policy settings, right from Windows Explorer.

Weird. Geeky. Neat.

The writeup is here:

http://www.grouppolicy.biz/2010/06/msdn-group-policy-search-out-now/

Item 2A:  Searching for GPOs… with comments.. Using Powershell
————————————————————–

The Group Policy team has a new blog entry which talks about the first two items I’ve listed. –And-  that blog entry continues to talk about Group Policy cmdlets in PowerShell.

The idea is that you can use the Group Policy cmdlets to search for attributes about GPOs themselves. Neat.

They’ve got a big ol’ PowerShell script you can use if you like right there.

However, my pal Jeff Hicks, PowerShell MVP helped me get it down to one quick line if you want to try it out. (Actually, it’s two lines.) Remember, you need a Windows 7 or Windows Server 2008 R2 machine with PowerShell installed to try this out.

Line 1: Import-Module GroupPolicy
Line 2:  get-gpo -all | where {$_.description} | Select Displayname,Description

When I run this command, I get the following output.. Neat !

DisplayName                      Description
———–                     ———–
OU 1                           Yep. Here’s a comment.

Item 2B: Searching for GPOs.. with comments .. No PowerShell
————————————————————

PowerShell isn’t for everyone; thought it is becoming the “de facto” way of doing lots of scripting. Mark Heitbrink, Enterprise Mobility MVP supplied this little nugget of goodness.

Note that this requires that you’ve got the Group Policy Scripts installed from here.

After that, you can use these canned VB scripts to run a command like…

cscript getreportforallgpos /c:gpo-report | find /i “something” c:gpo-report*.html

Final thoughts…
——————

That’s it. That’s all the stealing I’m doing for one day. Thanks to all my helpers.

PS: The inspiration of the title of this blog entry is from a song on of my favorite albums that no one ever heard of. Track 2; there’s a preview if you want to listen.
http://www.amazon.com/Its-Fun-Steal-Mono-Puff/dp/B0000069SW

PS: One seat left in Chicago with the FIRST7CHICAGO $300 off discount. Get the GP Training you need to rollout and secure your Windows 7 and Server 2008 R2 machines. Use that coupon code at checkout. https://www.gpanswers.com/training Don’t be that guy or gal who missed out. You can also call Diane at 302-351-4903 if you don’t want to sign up online.

Aug 2010
04

GPMC on Windows Server 2008 R2 and PowerShell

Team:

I’m racing toward getting out the door for my 30+ day trip to tour Australia and speak at Microsoft TechEd Australia and New Zealand.

But, I had a quick second to share a fun little PowerShell + GP tip… If you’ve NEVER used PowerShell before.. try this one. It’s fun and easy.

If you want to install the GPMC on a Windows Server 2008 R2 machine via command line, you can use PowerShell. The commands are as follows:

  • Import-Module Servermanager
  • Add-WindowsFeature GPMC

Then, if you then run the following command you will see the status as installed

  • Get-WindowsFeature GPMC

Try it.. something “special” that’s unexpected and neat happens. It’s super-fun !

Also.. I came across this super-nice write up of my latest book. I can’t even figure out the person’s name to thank him for such a nice review..  but, Thank You Mr. or Ms. Whomever you are.

Here’s the review:
http://www.anotherwindowsblog.com/2010/08/book-highlight-group-policy.html

Now, get your signed copies at:
www.GPanswers.com/book

Limited number, since I’m running out the door, and won’t have any to sign for a month !

Talk soon.. Gotta run !

Jeremy Moskowitz
GPanswers.com (Group Policy Community)
PolicyPak.com    (PolicyPak Software)