MDM & GP Tips Blog

Oct 2022
03

How to Setup Printing in the Cloud Using Universal Print (Part 3)

So, in our last article, we talked about registering printers with the Universal Print portal. We registered a couple of printers using the Universal Print Connector and then shared them to designated users through group assignment. Users can then browse the list of shared printers that they have access to and pick the appropriate printer according to factors such as location or printing capabilities. While this is fine for users needing to send something to a printer they normally don’t use, it’s easier for users to directly install printers on client machines. This is done by creating an Intune policy.

Creating a Printer Policy

All users that will be receiving the printer policy must be assigned a universal print license as mentioned in Part 1 of this series.  You also need the Printer Administrator role to create the policies and the target computers must have Windows 10 or Windows 11.

Using MEM go to Intune > Devices > Configuration profiles and create a new profile. Choose Windows 10 and later as the platform and Settings catalog as the Profile type. Name the policy, click “Add settings” and do a search for the word “printer” as shown below. Scroll down and select Printer Provisioning and select Printer Shared ID User.

You will need three bits of information about each printer you want to install. You can access this information from the overview section of each printer in the Universal Print portal as shown below.

Next, Input the Printer ID, Printer Share Name and Share Id in their designated boxes as shown below.

The final step is to assign the profile to the designated users.  You can then monitor the status of the policy using Intune as shown below.

While Universal Print may not be a viable choice for large enterprises yet, it may be a good solution for SMBs that have moved to Azure AD in pursuit of a native cloud solution and want to deprecate their on-prem printing infrastructure.

Sep 2022
19

How to Setup Printing in the Cloud Using Universal Print (Part 2)

In my previous article I outlined the prerequisites for Universal Print, a Microsoft 365 subscription-based service that you can use to centrally mange your printers using Azure. As mentioned, most printers require the Universal Print Connector to be registered in Azure for universal printing. You can download the UP Connector here.

The prerequisites for the UP Connector are shown below.

  • You can install it on Windows Server 2016 64-bit but Windows Server 2019 is recommended.
  • You may also install it on Windows 10 64-bit Pro or Enterprise, version 1809 or later.
  • The host computer will also need .NET Framework 4.7.2 or later.
  • The host computer should have a permanent internet connection and have sleep/hibernate disabled

Once downloaded, simply run the installer

Once installed you will see the screen below. Here will need to sign onto your Azure portal using an Azure AD account that is assigned to the Printer Administrator role.

Once you are signed in, you will need to create a Connector Name as shown in the screenshot below. This could be the name of a building, a department, a site, or just about anything that has significance within your organization.

In this example I chose Central_Office. You will then register the Connector name.

Once registered, you will be able to see the connector in your Azure Universal Printer portal. If you can’t readily find the UP portal in Azure, you can do a search for “Universal Print” to navigate to it as shown below.

Then click connectors to see your newly registered connector.

Now it’s time to register for the printers. You need to install the printers onto the computer hosting your connector.  These printers will then be shown as available printers within the UP Connector admin console. Select the printer or printers you want from the list and click register.  The printer(s) will now move to the registered printer list as shown below. The printer is now registered in Azure.

Now we need to share the printer. Go to the Universal Print Portal and you will see that your printer is registered and ready but not shared.

To share, select the printer’s checkbox and click Share as shown below.

Now you will give the printer a share name and select the groups or users that can access the share as shown below.

You can then select Printer properties and provide descriptors so that users know where the printer is located within your enterprise. This allows them to search for printers according to location. I have filled out some of the properties in the screenshot below.

Now the printer is shared and ready and will show all green as shown in the screenshot below.

Registering Universal Printers Directly

Printers that natively support Universal Print can be registered with Azure without going through the UP Connector. Simply access the printer’s admin console through a web browser. Every vendor’s admin portal is different but essentially you will need to name the printer and configure its network properties so it can access the Internet. Usually in the advanced settings, there will be a way to register the printer. The registration process will require you to logon to Azure with the proper credentials. The printer will then be registered and assigned a registration code. Once registered, you will then log onto Azure in the same manner I did earlier and share the printer.

Next: Creating Intune Policies

In our third and final segment on Universal Print, we will review the process of installing registered universal printers on computers across the network.

Sep 2022
07

How to Setup Printing in the Cloud Using Universal Print (Part 1)

So, you’ve migrated your enterprise’s on prem AD presence to Azure AD and now and are thinking that everything will be native cloud from here on out. There’s just one problem. Your users are still printing stuff and those printers rely on on-prem infrastructure. While many consider printing to be a legacy technology, organizations still depend on it. The problem is that printer management can be a time consuming and manually intensive ordeal having to deal with so many different types of printers, associated drivers, and spoolers. What’s more, assigning printers using Intune can be challenging at best.

Fortunately, there is an option available from Microsoft that allows you to upgrade your printer environment to a cloud-based print solution. It’s called Universal Print, a subscription-based service that runs on Microsoft Azure, providing a centralized print management for print administrators. Some of the benefits of Universal Print include the following:

  • No need to install printer drivers on PCs as printing takes place using the Internet Printing Protocol (IPP). There’s also no need for print servers for supported printers.
  • Provides remote users the ability to print at the corporate office and integrates with Windows 365 virtual PCs.
  • Printers can be assigned end-user locations at a granular level so users can easily find the right printer for their location whether it be a country, town, site, building, floor, etc. You can also assign printers using Intune.
  • Extensive reporting is available to monitor your print capacity as well as obtain a daily aggregated job count for each printer or user, giving you the visibility to understand what is happening in your print environment each month.
  • Enhanced security as machines must be joined to Azure AD to print and printing takes place over encrypted connections while all print data is contained in the same secure platforms that Online Exchange and Teams utilizes.

There’s obviously a lot of benefits to Universal Print so let’s look at how to implement it.


Prerequisites for Universal Print

Let’s start with the printers themselves. Some printers can integrate directly with Universal Print out of the box. Here’s a list from Microsoft of Universal Print ready printers. Chances are, most of your printers don’t support Universal print. In that case, you need to download the Universal Print Connector to an on-prem machine and add your printers to it. The Connector will serve as the intermediary between Azure and legacy printers.

Next you will need the right subscription. Universal Print is included with multiple commercial and educational Windows 365 and Windows 10 subscriptions. You can also purchase a standalone subscription as well. Applicable licenses include the following:

  • Windows 365 Enterprise F3, E3, E5, A3, A5
  • Windows 10 Enterprise E3, E5, A3, A5
  • Microsoft 365 Business Premium
  • Universal Print (standalone)

You can confirm whether your current license provides Universal Print access by going to your Azure portal and navigating to Azure Active Directory > Licenses > All products. Select a product from your list and click on “Service plan details.”

Each print user will need an assigned license. A Universal Print license is also required for all print administrators regardless of whether they print or not. Keep in mind that the designated license doesn’t allot you unlimited printing. Universal Print uses the same OPEX model that is characteristic of cloud computing services in that you only pay for the resources that you use. Universal Print comes with a pool of print jobs that equates to 5 print jobs per user per month. That means that 100 licensed users will be able to print 500 print jobs each month. A print job constitutes a single printed document regardless of how many pages or the number of copies printed. A colored printed document counts the same as a standard print job and attributes such as single vs. double sided do not matter either. Note that there is currently no way to enforce a print quota on individual users. While the license allots 5 print jobs per user, one user can consume all the print jobs over the course of a month. It is believed that quota management will be introduced down the road.

To configure or manage Universal Print, an admin must be a global administrator or be assigned the Printer Administrator role. I had to assign myself the print administrator role even though I was a global administrator to complete the configuration steps for this article series.

Finally, client devices must be running Windows client OS, version 1903 or greater.

Next: Installation and Configuration

In the next article, I will show how to install the Universal Print Connector to an on-prem machine and configure the Universal Print service. We will then assign the printers using Intune.


Mar 2022
08

Everything you Want to Know about Managing Windows Updates (Part 4)

In our final segment of this series, we are going to wrap up our discussion concerning Windows update management.  So now that you’ve configured your update rings and settings, you can create a compliance policy to reinforce them using Microsoft Endpoint Manager and going to the
“Devices |Overview” section and selecting Compliance policies near the bottom of the menu as shown below.  Here you can also click on Compliance status and view the compliance status of your enterprise fleet

Create a new policy and choose Windows 10 and later as the platform.  Name your policy and then go to Compliance settings > Device Properties.  Here you can set the minimum OS version to be compliant.  You can also set a maximum if desired.  In the example below I have assigned 21H1 as the minimum OS version with 21H2 as the max. 

You can then determine what your action will be for non-compliant status.  You can choose to either send an email to the user of the device or choose the hard-core action of retiring the device for noncompliance as shown in the screenshot below.  A grace period of 3 days has also been configured.

The final step is to assign the compliancy policy to your designated group(s). 

Managing Updates in a Co-managed Environment

Those enterprises that use Microsoft Endpoint Manager Configuration Manager can utilize either WSUS or Windows Update as their update source.  Here’s a good example of the flexibility this offers.  Let’s create a GPO and go to Computer Configuration > Administrative Templates > Windows Components > Windows Update > Manage updates offered from Windows Server Update Service.   Here you would configure settings to specify the IP address of the WSUS server.  The settings we want to focus on is “Specify source service for specific classes of Windows Updates” as is shown in the screenshot below.

Enable the policy and then choose the source service for each update class.  In the example below I am assigning the WSUS server as the feature update source and Windows Update for quality updates.

While we are in Group Policy, let’s look at some other useful settings.  If you are fully managing the update environment for your end user devices, there is no need to perpetually send Windows update notifications to users.  In the screenshot below I enabled the Display options for update notifications.  Note that I have also enabled “Speficy deadlines to use Windows Updates and restarts” where just as I demonstrated in MEM earlier, you can assign a deferral period and grace period for Quality updates and Feature updates.  I also chose to remove access to all Windows update features for good measure by enabling that policy.

Here I chose to disable all update notifications other than restart warnings in order to give them a heads up about pending restarts.

Conclusion

Ensuring that all your Windows machines receive the latest quality updates is one of the most important steps you can do to secure your devices.  Quality updates fix bugs and improve the reliability of your machines so that they run optimally for users.  While feature updates are not as imperative, they cannot be ignored either as you need to make sure that users have access to new features that can help stimulate innovation and improve productivity.  It’s a big job, but Microsoft provides the management tools to ensure that your machines remain update accordingly. 

Mar 2022
01

Turn Back Time with Windows Known Issue Rollback

There are times when we all wish we had the ability to turn back time to undo a mistake.  This is certainly the case for Windows support teams that have had to deal with a sudden surge of help desk calls due to the havoc created by a recent non-security bug fix in a recent Windows update.  The traditional way to remediate such an issue has been to uninstall the update, a time-consuming process that overstretched IT personnel don’t have time for.  How great it would be if there were a way to simply roll back to the prior state up the update by implementing a single policy.

Known Issue Rollback (KIR)

Microsoft released Known Issue Rollback (KIR) beginning with Windows 10, version 2004.  Its purpose is to improve support for non-security bug fixes and make life a little easier for internal IT by rolling back the undesired changes of an update.  KIR starts at the code level as every non-security bug fix retains the old code while adding the fix on top of that.  Fixes are enabled by default, thus disabling the old code.  A KIR policy, however, can disable the fix however and revert the OS back to the old code-path, problem averted.

Now, when Microsoft determines that a non-security update has an issue, it generates a KIR to roll it back.  Microsoft’s goal is to deploy a KIR within 24 hours of identifying the root cause of a reported problem so that most users are never exposed to the bug.  For non-enterprise users, the process is completely automated, requiring them to do nothing.  In many cases the KIR will be implemented prior to the download being installed.  End users that have installed the update will be prompted to reboot their machines.

KIR and the Enterprise

The process is a little more involved for enterprise customers.  In this case, Microsoft releases a policy definition MSI file that admin teams can deploy using Group Policy (an Intune solution reportedly on its way).  These KIR policy definitions have a limited lifespan of only a few months as the aim for Microsoft is to quickly address the issue through a new update.  KIRs are announced by Microsoft through Windows Update KB articles and listed on the Known Issues list located on the Windows Health Release Dashboard where you can find a link to download the MSI.

Creating a KIR Group Policy

Once downloaded, simply run the MSI which will install the ADMX/ADM template files into the local store at C:\Windows\PolicyDefinitions as is shown in the screenshot below:

You can use the Local Group Policy editor to create a KIR policy for the local machine.  To deploy the policy to multiple machines across your domain, you will need to copy the files to your central store located in your SYSVOL folder.  Be sure to include the ADML template file located in the EN-US folder.

In this example I am using a KIR that was released last year for Windows 10 version 2004.  I first made a GPO using the Group Policy Management Console and named it KIR Issue 001.  Then go to Computer Configuration > Administrative Templates > and select the KB rollback issue listed as shown below.

Then open the policy setting and choose Disabled.

You can create a WMI filter to specifically target machines running the designated Windows version. This is done in the Group Policy Management Console by right-clicking WMI Filters and selecting New.  Name the filter something like “Apply to all Windows 10, version 2004 devices.”   Then insert the following string:

SELECT version, producttype from Win32_OperatingSystem WHERE Version = "10.0.19041"

The screenshot below shows the newly created WMI.  You can find out the build number of your Windows version here

Now go back and highlight the GPO you just created and look for the WMI Filtering section at the bottom where you will select the appropriate filter.  You can also use a third-party solution such as PolicyPak to for granular filtering as well.

Conclusion

KIR is a recent Windows servicing technology that can help you escape from the nightmare of a Windows update bug-fix gone bad.  This is also a good example of why you should manage your Windows updates using Windows Update for Business that gives you greater management control over when and how updates are implemented throughout your enterprise. 

Feb 2022
14

Everything you Want to Know about Managing Windows Updates (Part 3)

In my last blog segment, I used MEM to configure some policies related to Windows updates.  Let’s now see what happens behind the scenes because there is an awful lot that goes on each time a policy assigned device goes seeking updates.

In this instance, I have a policy Feature Update Deployment policy assigned to a desktop PC that currently hosts Windows 10 21H1.  Since 21H1 was released back in April of 2021, it obviously needs updating.  Let’s say I have been working remotely from home for a using my laptop and haven’t been to the office in months.   In the feature update policy, I created I chose to deploy Windows 11.  I also chose a specific time frame that it would be made available as I want to give our IT team additional time to test for Windows 11 compatibility issues concerning our application portfolio.  In this case I chose February 21, 2022, as the earliest available date.  The PC is also assigned to a business update ring that has a quality update deferral period of 7 days.

On February 11, I return to the office for a department meeting and power up the desktop.  MEM has already contacted Windows Update and provided the PCs ID and the targeted feature update to be deployed.  MEM also will deliver any new policies that have been assigned to the PC since the last time it was online.  In this case it includes the Business Update for Ring policy settings.  Next the PC will contact the cloud to seek possible updates.  In doing so, the PC informs Windows Update of any assigned deferral periods, its current OS version, and its revision status.  This entire process is outlined in the diagram below.

Let’s see what happens first regarding feature updates.  There are two feature updates available on February 11 for the PC - Windows 10 21H2 and Windows 11.  Because the targeted feature update policy dictates Windows 11, 21H2 is out of the picture.  Windows 11 would be made available if it wasn’t for the deployment period I specified which starts on February 21.  That means no feature updates for our desktop PC today.

Now let’s look at Quality updates.  Since my computer hasn’t been powered up in quite a while, its missing a lot of quality updates so it’s revision status is quite outdated.  Fortunately, quality updates are cumulative, so I don’t have to download the updates released every single month since it was last powered on.  Quality updates are released on the 2nd Tuesday of each month.  This means the most recent release date was February 8.  Because I have a deferral period of 7 days, February updates will have to wait a few more days before they are made available.  As a result, the January Quality updates will be applied to my desktop. 

I then spend the next few days using my laptop at home and return to the office on February 16.  Once again, my desktop PC checks in for Windows updates and because the deferral period is now over, February quality updates are now downloaded and installed.  Windows 11, however, will remain elusive until the 21st.  On February 23rd, I return to the office and Windows 11 is now available.  For the update to be issued, Windows Update must first determine if it is compatible or not.  This is performed automatically using Windows Update for Business.  If you have Update Compliance configured in Azure along with a Log Analytics Workspace, you can verify the compliance status of any listed device.  While the PC itself may exceed the compliancy requirements of Windows 11, the update can still be deferred due to a safeguard hold assigned by Microsoft.  Safeguard holds prevent devices with a known compatibility issue from receiving a new feature update.  For instance, an installed application on the device may have compatibility issues with Windows 11.  You can read more about safeguards here in one of my other blogs.  In this instance, there is a safeguard hold assigned to my desktop so until a fix is released for that issue it will have to wait on Windows 11 for a while.

More to it than Meets the Eye

As you can see, there are a lot of moving parts when it comes to Windows Updates for Business.  In our remaining segment, we will wrap up our discussion by looking talking about compliance deadlines, automatic restarts, and touch on Group Policy one last time. 


Jan 2022
17

Everything you ever Wanted to Know about Managing Windows Updates (Part 2)

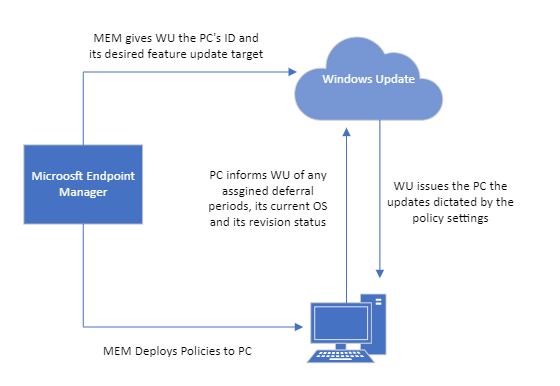
Think of WSUS as version 1.0 for managing Windows updates.  Windows Update for Business can be considered version 2.0 as it is the next evolutionary step for managing updates for Windows 10 and Windows 11.  Unlike WSUS, clients connect directly with Microsoft Endpoint so there is no intermediary server involved.  All you need is a management tool such as Group Policy Management Console, an MDM tool such as Microsoft Endpoint Manager or a third-party management tool.  The management tool is where you create the update policies and assign them to designated device groups.  Once the clients receive the policy, they contact Microsoft endpoint which sends them one or more updates depending on the client’s provided inputs.  If you have the Windows Update for Business Deployment service installed, the manager can talk directly with Microsoft Endpoint as well.

Deferring and Pausing Updates

One of the enhanced features that Windows Update for Business provides is the ability to defer the installation of both feature and quality updates for a specified number of days.  The deferment period depends on the type of update as shown below.

Update Category                             Maximum deferral period

Feature updates                                             365 days

Quality updates                                                30 days

Non-deferrable                                                   0 days

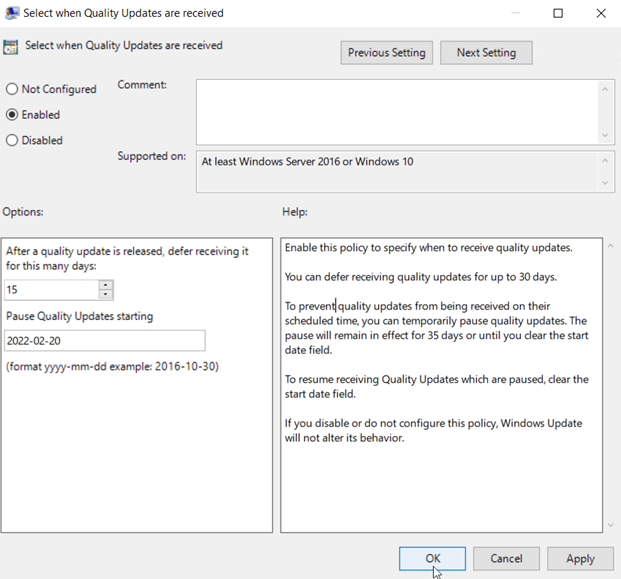
You can also choose to pause quality or feature updates all together.  This is similar to deferring an update except you specify an exact date.   Beginning on that date, updates are paused for 35 days.  This is useful if you discover that one of the recent updates is causing problems and you want to buy some time to conduct further testing.   You can configure the required settings to defer or pause an update using Group Policy.  Create a GPO and go to Computer Configuration > Administrative Templates > Windows Components > Windows Update > Windows Update for Business where you will see several policy options.  In the screenshot below, we have configured a deferment period of 15 days as well as a specific date to start pausing Quality updates.

Windows Update Rings

Windows Update for Business also gives you the ability to create update rings to fine tune the deployment of quality and feature updates.  Rings specify how and when quality and Windows 10 and Windows 11 feature updates are applied.  For instance, let’s say you want to deploy the Windows 11 feature update.  For a large corporation you certainly wouldn’t want to install it on everyone’s computer at once right out of the gate.  You would probably want your IT personnel group to receive the update first to allow them to test it out first.  That would mean creating a fast update ring and assigning it to them.  You would next want to update devices for power users such as software developers, graphical artists, etc.  You would create a slower ring and, and so on.  Below is an example of a 3-ring architecture.

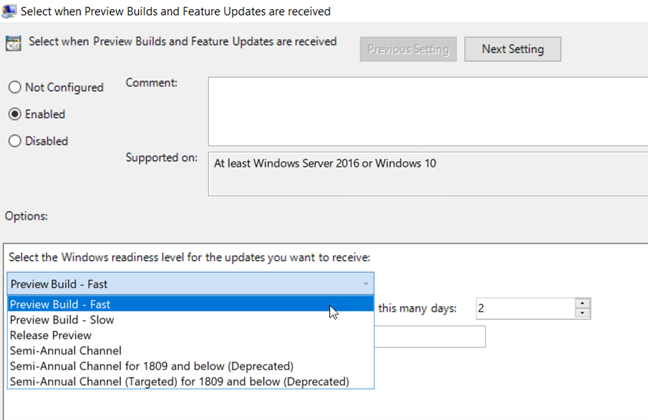
You can create these rings using the Group Policy Management Console.  Create a GPO and go to Computer configuration > Administrative Templates > Windows Components > Windows Update > Windows Update for Business > Select “When Preview Builds and feature updates are Received.”  Enable the policy and select the ring of your choice as is shown in the screenshot below.  Then assign a deferral period for that ring.  In the example below we have chosen a 2-day deferral period for the Fast Ring.  We would then choose a longer period of perhaps 45-days for the slow ring.

To create rings for Quality Updates you would create a policy and go to Computer configuration > Administrative Templates > Windows Components > Windows Update > Windows Update for Business > Select when Quality Updates are Received. 

Using MEM to Manage Windows Updates for Business

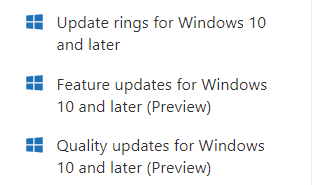
You can also use Microsoft Endpoint Manager to manage Windows Updates for Business.  If you open  MEM and go to Devices you will see 3 options.

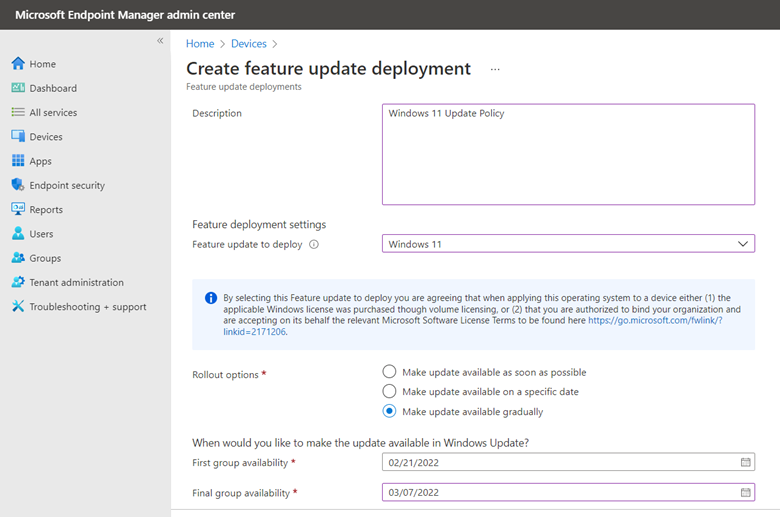
A small enterprise may not feel the need to utilize multiple update rings.  If you want to simply deploy Windows 11 at large, click “Feature updates for Windows 10 and later” and select Windows 11 as the feature update.  You can then choose between pushing the update as soon as possible, making it available on a specific date or gradually dispersing the update across your enterprise.  In the example below I chose the third option and set a start and finish time for the deployment.

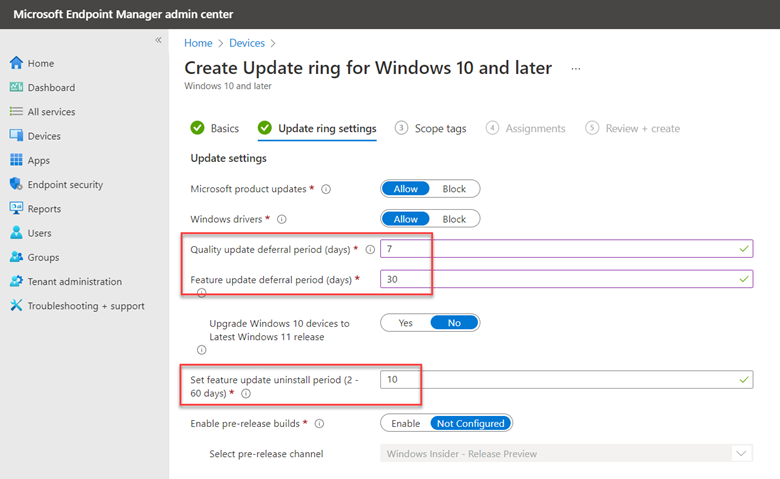
If you want to use update rings, the process is similar.  Create a ring with your desired settings and assign it to a designated group.  Note below the addition of an uninstall period that you can assign. 

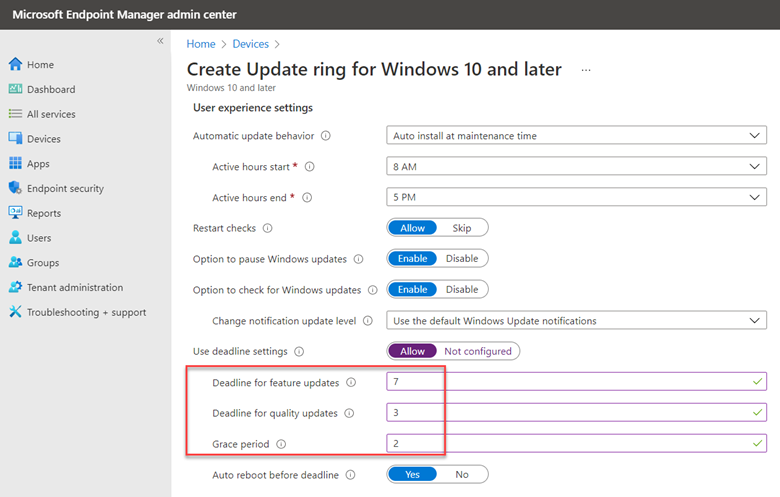
You can also configure User Experience settings for each ring.  User experience settings give your users the ability to defer updates on their own when necessary.  This would be important for a sales executive that is attending a sales conference for instance and needs the full use of their computer for an extended time.  For instance, you can configure a grace period that specifies the number of days until a device is forced to restart.  This would be useful for users returning to the office from extended leave or a long holiday period.  You should first configure the active hours so that update-initiated reboots do not occur during this critical time window.  You can then configure deadlines.  In the screenshot below, users could defer feature updates on their own for 7 days, at which point the update would forcibly install.

Service Channels

Finally, there is something called Service Channels.  Service channels define when features updates will be available.  For instance, someone that is a member of the Windows Insider Program probably wants to receive feature updates in advance to preview them.  Internal IT needs access to new feature updates ASAP to validate them for their desktop environments.  These four channels are as follows:

  • General Availability Channel – This is the default channel
  • Windows Insider Dev
  • Windows Insider Beta
  • Windows Insider Release Preview

You can create policies using Group Policy or MDM to create policies that assign these channels.

Putting it all Together

Windows Update for Business obviously has a lot more moving parts than the media or WSUS methods.  Things can get complex quickly.  In part 3 of our ongoing series, we will look at an environment involving multiple Windows feature versions and deferral settings to see how the underlying processes occur to ensure that each device receives the updates it needs. 


Dec 2021
28

Everything you Want to Know about Managing Windows Updates (Part 1)

Managing Windows updates is one of the most important functions for Windows admins today.  The methodologies available to manage and deliver updates to Windows servers, desktops and laptops has changed a lot over the years.  In this 4-part series, we will outline the different management options that are available today and break down how Windows Update Manager works and why it should be the preferred management alternative for today’s enterprises.  Before we get started, define what we mean by Windows updates.

Types of Windows Updates

There are two broad categories of Windows updates.  The first is quality updates.  These are the updates that are mostly released on what we have come to traditionally know as ‘Patch Tuesday.’  Quality updates are referred to cumulative updates or maintenance updates.  Most quality updates are released to either address a security issue or fix a problem to improve the reliability and security of Windows.  These are known as mandatory updates.  Other quality updates may provide some preview enhancements of existing features.  A reboot may be required once all the newly downloaded quality updates are installed. 

Then there are feature updates.  Feature updates are made available twice a year and are known as semi-annual releases.  You can think of a feature update as a new version of Windows.  Feature updates can be deferred for up to 365 days although each new version is only supported by Microsoft for a period of 18 months which is another benefit of updating.  Feature updates can introduce new features as well as visual changes to the operating systems.  The objective here is to constantly improve the Windows operating system.  A feature update may require a series of reboots to complete the update process.   

Now let’s look at the three primary ways of managing Windows updates.

Media

This is the most basic way of all to manage Windows updates.  Here the computer contacts Microsoft Endpoint directly to learn of any available updates.  The local admin of the computer can then choose to either download and install those updates at a designated time or defer them to the automated process.  This one-to-one relationship is shown below.


Obviously, this method is not suitable for enterprise environments as there is no way to centrally manage the updates of multiple machines.  It is designed for personal users or very small SOHO environments. 
 

Windows Server Update Services


Windows Server Update Services (WSUS) has been around for a long time and used to be the primary way that admins managed Windows updates for enterprise environments.  WSUS was designed back in the days of a totally on-prem world.  Think of the WSUS server as a repository for Windows updates.  Rather than each Windows machine directly contacting Microsoft for updates and using a lot of precious bandwidth in the process, the WSUS server downloads all updates and retains them on local storage.  Besides the WSUS server itself, WSUS also requires a manager which can be one of the following:

  • The WSUS Stand-alone console
  • Group Policy
  • MEM CONFIG Manager
  • A third-party management tool

Regardless of which management tool you choose, you must create policies to govern the Windows update process.  The policy must identify the WSUS server and outline when updates will occur.  These policies can be assigned to either device groups or the devices themselves.  The admin then approves which updates they want to distribute.  The manager then then informs the WSUS server of the newly approved list.  When prompted by their assigned policies, Windows devices then scan their updates against the WSUS server itself.  The WSUS server then offers each device any approved updates that it is missing.  This process is outlined below.

WSUS was an ideal solution for managing Windows updates for enterprise environments at one time.  There are two primary limitations of WSUS currently.  The first is the fact that Microsoft has not provided any enhancements to WSUS in years, and it will eventually be deprecated.  The bigger factor however is that the world has changed in recent years.  WSUS cannot adequately service hybrid work models and remote work strategies as all Windows desktops must be connected in some way to the local network.  For this and other reasons, Windows Update for Business is a better choice in many cases.  In our next blog segment, we will look at the architecture of Windows Update for Business and how to implement it.


Sep 2021
28

Microsoft will offer New Extended Stable Release for Microsoft Edge

Believe it or not, the new Chromium-based Microsoft Edge browser has grown by 1,300 percent in the past year.  One of the contributing reasons to its popularity surge is the perpetual release of innovation that Microsoft unveils on a regular basis in the form of feature updates.  At the same time, Microsoft is aware that many enterprises want to have some degree of control over how often these new features are distributed to their users. 

  • Stable Channel
  • Beta Channel
  • Dev Channel
  • Canary Channel

The Canary Channel puts you on the bleeding edge, providing you with the newest innovations as quickly as possible.  At the top of the chain is the Stable Channel which is best suited for production environment and intended for broad deployment throughout your organization.  Microsoft has traditionally released feature updates every 6 weeks for the Stable Channel and Beta Chanel.  Microsoft is making some changes however starting with Microsoft Edge 94., which is currently scheduled to be released for the Beta Channel beginning the first week of September.  Those using the Stable Channel will have to wait until the week of September 23.  You can see the complete Microsoft Edge release schedule here.

Starting with Microsoft Edge 94, Microsoft is switching to a 4-week release cycle.  Part of this is in reaction to Google’s announcement to do the same thing for Chrome version 96 in the fourth quarter of 2021.  Another reason though is to feed the insatiable appetite that users have for new innovative features.  This of course is what agile software development is all about.  Microsoft knows however that not every enterprise is ready to adapt to a shortened release window.  For organizations that want to move more cautiously, Microsoft will bring a new release channel called “Extended Stable” which will provide a longer 8-week release timeline.  Like the current channels, admins can opt-in to this channel using either Group Policy or Microsoft Endpoint Manager.  If you don’t create a policy for the new channel, Microsoft Edge will default to the 4-week release cycle.

Those who go with the 8-week Extended Stable release option will receive cumulative feature updates aligned with even-numbered releases.  Any feature updates of an odd-numbered release will be then delivered as part of the subsequent numbered release.  Microsoft will continue to provide Assisted Support for the three most recent Stable Channel releases that equates to approximately 12 weeks.  Assisted Support will be available for the two most recent Extended Stable channel releases which equates to 16 weeks.  For more information you can refer to the Microsoft Edge Lifecycle Policy.

Keep in mind that security patches and fixes operate independently and will continue to be deployed as needed.  If you don’t use Windows Update for Business to manage updates, you can always download Microsoft Edge updates using Windows Services Update Server (WSUS).

Jun 2017
06

XenServer, vCenter and vSphere all require SMB V1... so, I WannaCry.

Microsoft Posted a HUGE list of products which still have SMB1. Here’s the MEGA LIST.

Then I also just got this email from my pal Webster who runs the famous Citrix-focused blog “The Accidental Citrix Admin” blog over at http://carlwebster.com/

If  Webster got zapped, you might get zapped too. Here’s the note:

I disabled SMB V1 on both of my Synology NAS units.

I run both vSphere 6.5 and XenServer 7.1 in my lab.

Everything was fine since all the hosts already had connected to all their storage.

Before I left for three back-to-back conferences, I shutdown EVERYTHING in my lab.

All nine servers, both Synology NAS units, my laptops, tablets, and switch.

Ten days later, I come home and power everything back on. Guess what? None of the hosts would work.

Guess who REQUIRES SMB V1 to work? Both Citrix XenServer and VMware vCenter and vSphere.

After re-enabling SMB V1 on both NAS units, I had to destroy all storage connections and re-create them to get them to reattach. Six wasted hours. A simple Google search BEFORE disabling SMB V1 on my storage devices would have revealed numerous articles stating that XenServer, vCenter and vSphere all require SMB V1.

SHEESH !!