The Dynamic Duo: Leveraging Compliance and Conditional Access in Intune
Enterprise cloud accounts, particularly services like Office 365, face constant cybersecurity threats from malicious actors. While enforcing strict password complexity requirements can help protect these accounts, this approach alone has significant limitations. Complex passwords may lead users to create workarounds that actually reduce security such as writing passwords down or reusing them across multiple accounts. There is also a linear correlation that as password complexity increases, organizations typically see a corresponding rise in password-related help desk tickets, increasing IT support costs and reducing productivity.
However, even properly authenticated users can pose security risks when accessing systems from compromised devices. Organizations need to prevent access from endpoints that have security vulnerabilities or malware infections, regardless of valid user credentials. Of course, when users are accessing resources from their home, you can’t be sure what type of device they may be using.
If you use Microsoft Intune to manage your user accounts, you can leverage two key policy types working in tandem: Conditional Access policies and compliance policies. When implemented together, these policies ensure organizational resources are only accessible from devices that meet your security requirements. Conditional Access policies define the circumstances under which access is permitted, while compliance policies establish the security standards devices must maintain.
Create a Compliance Policy
Compliance policies in Microsoft Intune are sets of rules and conditions used to evaluate the configuration of your managed devices. These policies help secure organizational data and resources by ensuring devices meet specific configuration requirements. Devices must satisfy the conditions set in these policies to be considered compliant by Intune such as:
- Requiring encryption (e.g., BitLocker).
- Enforcing password complexity.
- Ensuring the device is not jailbroken or rooted.
- Setting minimum/maximum OS versions
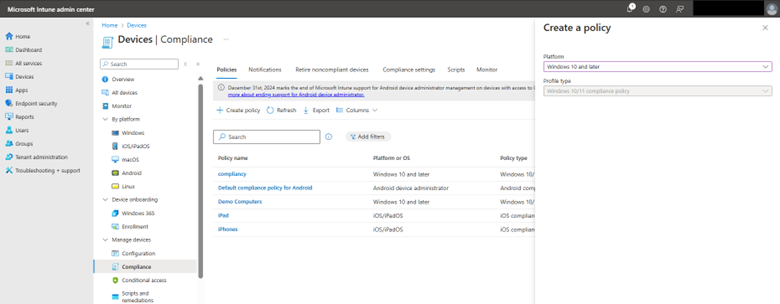
To create a compliance policy in the Microsoft Intune Admin Center, navigate to Devices > Compliance and select “Create Policy” as shown in the screenshot below.
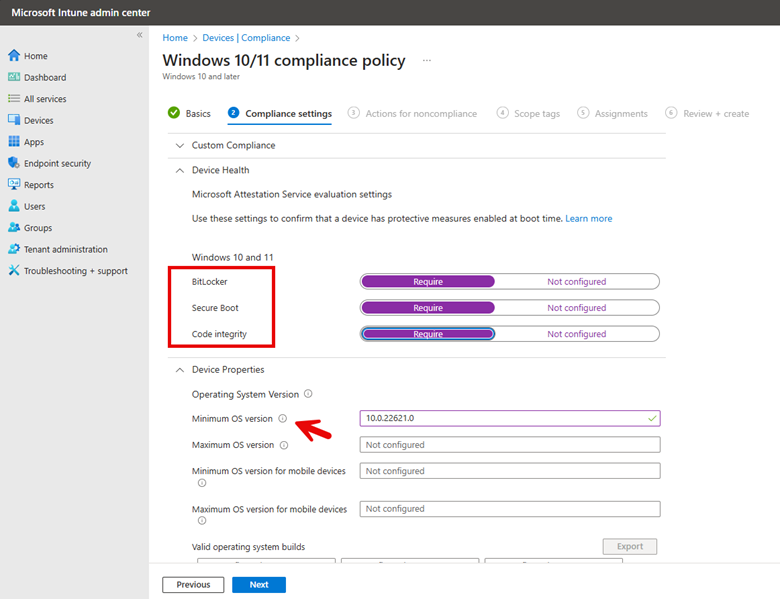
Name your policy and then choose the compliance settings you want. In the example below, I want all compliant machines to have BitLocker, Secure Boot, and Code integrity enabled. Because all my employees are running machines with Windows 11, version 22H2, I chose that as the minimum operating system to be compliant. For the minimum operating system version in Intune, you would specify:
Minimum OS Version: 10.0.22621.0
This corresponds to Windows 11, version 22H215. By leaving the maximum OS version blank, you are allowing those with later versions access. See the screenshot below.
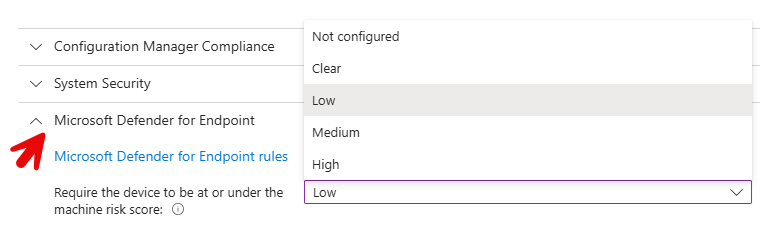
Because I am running Microsoft Defender for Endpoint on employee machines, I will configure Microsoft Defender for Endpoint rules in the compliance policy. Here, I am requiring that all devices be at or under a machine risk score of Low. This means that Devices with "Medium" or "High" risk scores will be marked as noncompliant.
The compliance policy will immediately mark the device as noncompliant when any one of these conditions is not met. On the next screen, you can configure additional Actions for noncompliance, such as sending email notifications to users or remotely locking devices. For this example, I am going to skip this section and proceed to apply the policy to all users and groups.
Creating a Conditional Access Policy
Conditional access policies serve as a type of gatekeeper for designated resources of your organizations. These policies make real-time decisions about whether to grant, limit, or block access to resources based on specific conditions. You can create policies that do things such as:
- Require MFA when accessing resources from outside your corporate network
- Only allow access from devices that are encrypted and up-to-date on security patches
- Block access from countries where your company doesn't operate
- Enforce browser-only access for unmanaged devices
- Require periodic re-authentication for sensitive applications
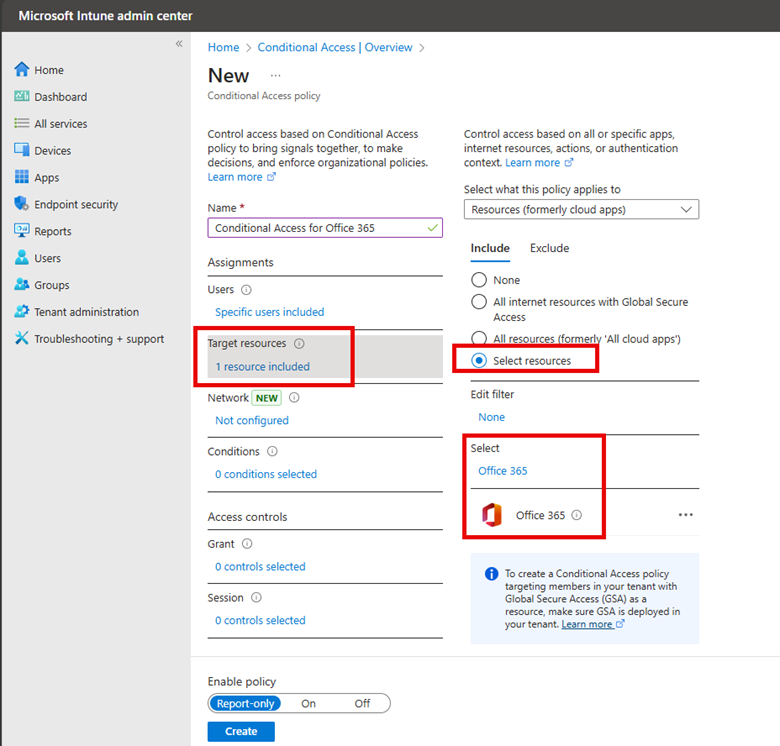
To create a conditional access policy, navigate below to Conditional access and click on “Create new policy” and name it. In my example here, I selected a group and then chose Office 365 as the target as shown below.
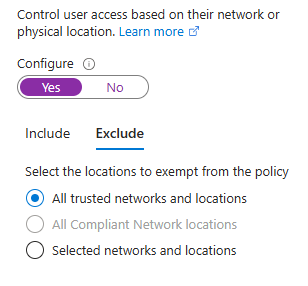
One of the purposes of this conditional access policy is to scrutinize all the login attempts from off prem locations. By excluding trusted networks from the policy, we maintain seamless access for users on known secure networks while enforcing additional security measures for connections from elsewhere.
For this configuration to be effective, trusted network locations must be pre-defined in the Microsoft Entra admin center. These typically include:
- Corporate office network ranges
- Known VPN network ranges
- Other verified secure networks
The screenshot demonstrates this configuration:
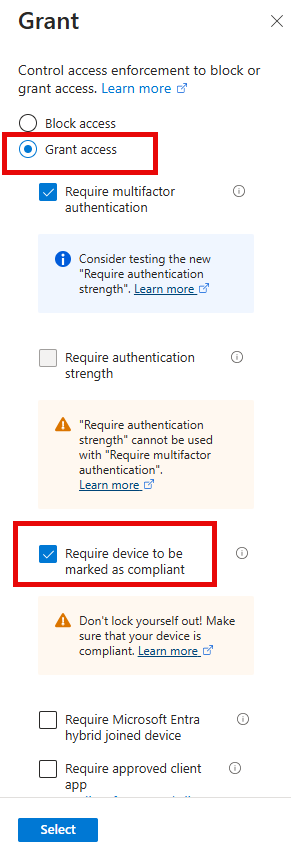
I then created two conditions that must be met to grant access:
- Require multifactor authentication (MFA) only for off-premises access attempts. Users accessing resources from within the corporate network (on-premises) will not need to go through MFA.
- Require that all computers must be compliant with the organization's policies to prevent employees from logging in using personal, potentially unsecured devices when off-prem. The associated compliance policy created earlier ensures that off-premises devices meet the same operating system and Microsoft Defender for Endpoint requirements as on-premises users.
The selections are shown in the screenshot below:
Conclusion
Of course, I have only scratched the surface here of possibilities. The configurations discussed here represent just a small sample of Intune's extensive security capabilities. Conditional Access and compliance policies can be customized with numerous additional controls and requirements to match your organization's specific security needs and risk tolerance. As threats evolve and organizational requirements change, these policies can be adjusted and you should regularly review and update your policies. By leveraging the full potential of Intune's policy framework, organizations can build a dynamic, responsive security posture that aligns with the principles of zero trust while enabling a modern, flexible workplace.