MDM & GP Tips Blog

Feb 2025
03

How to Validate Dynamic Groups in Microsoft Intune

There are two different types of groups you can create with Intune. The first is the traditional “Assigned Group” in which administrators manually add or remove members. This means of course that group membership only changes when an administrator makes a change. These are best for small organizations or small stable groups within a larger enterprise.

“Dynamic Groups” offer an automated approach to group management, where membership is determined by specific query rules and conditions. Here, members are added or removed in real-time as they meet or no longer meet the specified criteria. These are ideal for large enterprises, large groups that change membership, or large-scale deployments based on departments, locations, or device types.

How to Create a Dynamic Group

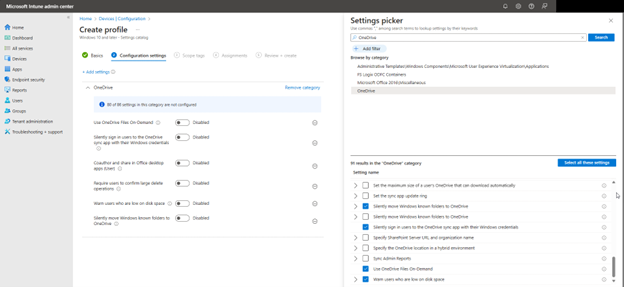
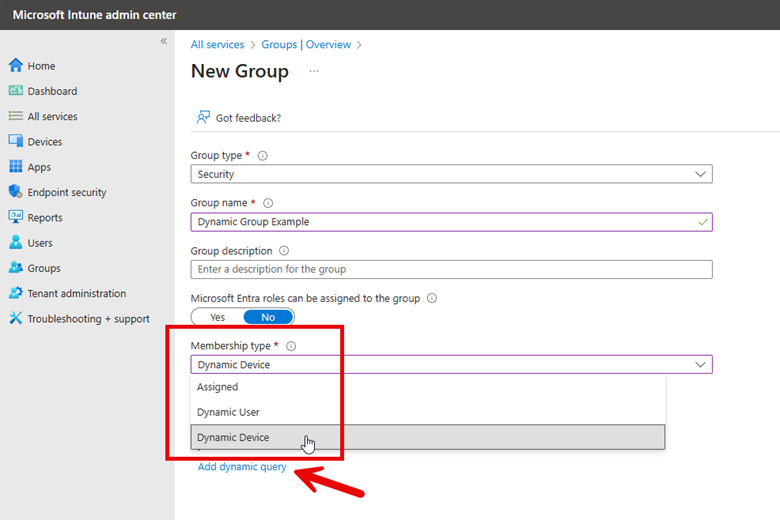
There are two ways to create dynamic groups. The first is using the Microsoft Intune admin center and navigating to Groups and select “New group.” On the next page you will create a name for the Group and state whether it is an Assigned or Dynamic group. In the screenshot below, I have selected Dynamic Device.

Now I need to create a dynamic query which will dictate the membership criteria. The screenshot above shows the “Add dynamic query” links that takes me to where I will create the Dynamic membership rules. Here you will use the wizard to create the rules that are comprised of properties, operators and values. You can add as many expressions as you want.

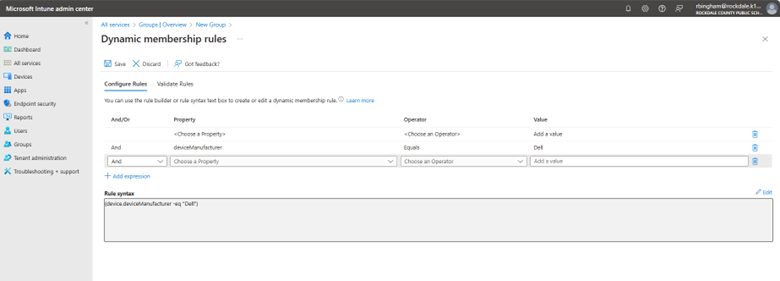
Here are some examples of possible groupings you can do:

  • To automatically group all devices running Windows 11 the rule would be:
    (device.operatingSystem -eq "Windows") and (device.deviceOSType -eq "11")
    You can use this group to deploy security baselines policies or upgrade legacy systems.
     
  • You can also make a group comprised of a specific Windows version such as Windows 11 24H2 Devices as follows:
    (device.deviceOSVersion -startsWith "10.0.261")
  • Group All Users in a Specific Department such as Finance:
    (user.department -eq "Finance")
  • You can build composite rule sets combining multiple criteria, for example, a group that identifies corporate Windows 10 devices by validating both the operating system version and company ownership status in a single expression:
    (device.deviceOSType -startsWith "Windows") and (device.deviceOSVersion -startsWith "10.0") and (device.deviceOwnership -eq "Company")

Dynamic Group Validation

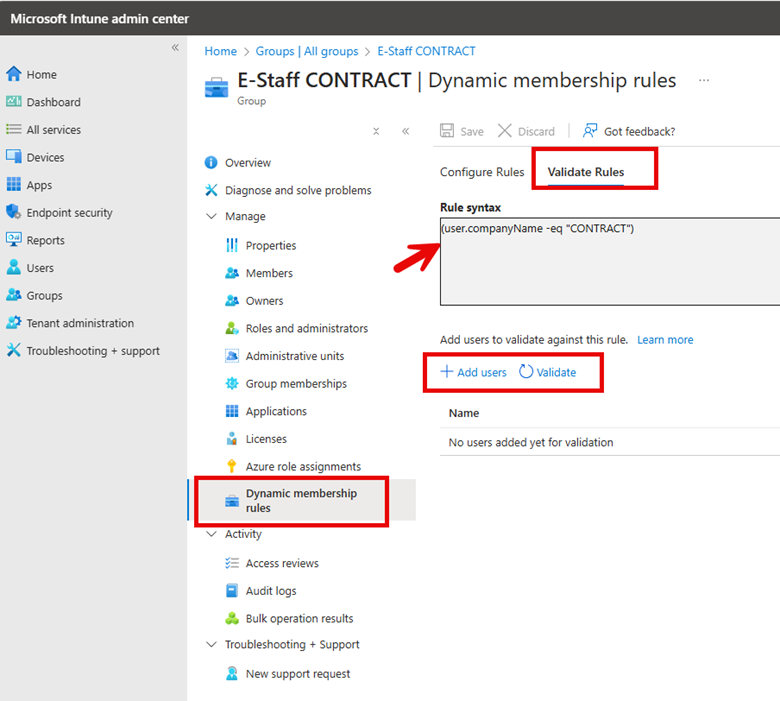
Before using new dynamic groups in a production environment, you should validate the rules to confirm that the dynamic rule results operate as expected. To do this, go to Groups in the Microsoft Intune admin center, select the group you want to validate, and navigate to the Dynamic membership rules section. Click "Validate Rules", add users or devices that should be included in the group, and then click "Validate" to confirm the proper assignment. The screenshot below outlines these steps.

Note that dynamic groups don't update instantly and may take up to 24 hours to process changes.

I mentioned there are two ways to create and validate Dynamic Groups because you can also use the Microsoft Entra ID portal using the exact steps I used in Intune. You can also use PowerShell to validate dynamic group membership using the following cmdlet:

$GroupID = ""

$UserID = ""

Get-MgGroupMember -GroupId $GroupID | Where-Object { $_.Id -eq $UserID }


If the output is empty, the user or device is not part of the group, meaning the rule might need adjustments.

As organizations continue to grow and evolve, the ability to automatically manage group memberships based on specific attributes becomes a necessity for maintaining security, compliance, and operational efficiency. By leveraging rule-based membership, these groups significantly reduce administrative overhead while ensuring that access controls, policy applications, and resource distributions remain current and accurate. 

Jan 2025
20

The Dynamic Duo: Leveraging Compliance and Conditional Access in Intune

Enterprise cloud accounts, particularly services like Office 365, face constant cybersecurity threats from malicious actors. While enforcing strict password complexity requirements can help protect these accounts, this approach alone has significant limitations. Complex passwords may lead users to create workarounds that actually reduce security such as writing passwords down or reusing them across multiple accounts. There is also a linear correlation that as password complexity increases, organizations typically see a corresponding rise in password-related help desk tickets, increasing IT support costs and reducing productivity.

However, even properly authenticated users can pose security risks when accessing systems from compromised devices. Organizations need to prevent access from endpoints that have security vulnerabilities or malware infections, regardless of valid user credentials. Of course, when users are accessing resources from their home, you can’t be sure what type of device they may be using.

If you use Microsoft Intune to manage your user accounts, you can leverage two key policy types working in tandem: Conditional Access policies and compliance policies. When implemented together, these policies ensure organizational resources are only accessible from devices that meet your security requirements. Conditional Access policies define the circumstances under which access is permitted, while compliance policies establish the security standards devices must maintain.

Create a Compliance Policy

Compliance policies in Microsoft Intune are sets of rules and conditions used to evaluate the configuration of your managed devices. These policies help secure organizational data and resources by ensuring devices meet specific configuration requirements. Devices must satisfy the conditions set in these policies to be considered compliant by Intune such as:

  • Requiring encryption (e.g., BitLocker).
  • Enforcing password complexity.
  • Ensuring the device is not jailbroken or rooted.
  • Setting minimum/maximum OS versions

To create a compliance policy in the Microsoft Intune Admin Center, navigate to Devices > Compliance and select “Create Policy” as shown in the screenshot below.

Name your policy and then choose the compliance settings you want. In the example below, I want all compliant machines to have BitLocker, Secure Boot, and Code integrity enabled. Because all my employees are running machines with Windows 11, version 22H2, I chose that as the minimum operating system to be compliant. For the minimum operating system version in Intune, you would specify:

Minimum OS Version: 10.0.22621.0

This corresponds to Windows 11, version 22H215. By leaving the maximum OS version blank, you are allowing those with later versions access. See the screenshot below.

Because I am running Microsoft Defender for Endpoint on employee machines, I will configure Microsoft Defender for Endpoint rules in the compliance policy. Here, I am requiring that all devices be at or under a machine risk score of Low. This means that Devices with "Medium" or "High" risk scores will be marked as noncompliant.

The compliance policy will immediately mark the device as noncompliant when any one of these conditions is not met. On the next screen, you can configure additional Actions for noncompliance, such as sending email notifications to users or remotely locking devices. For this example, I am going to skip this section and proceed to apply the policy to all users and groups.

Creating a Conditional Access Policy

Conditional access policies serve as a type of gatekeeper for designated resources of your organizations. These policies make real-time decisions about whether to grant, limit, or block access to resources based on specific conditions. You can create policies that do things such as:

  • Require MFA when accessing resources from outside your corporate network
  • Only allow access from devices that are encrypted and up-to-date on security patches
  • Block access from countries where your company doesn't operate
  • Enforce browser-only access for unmanaged devices
  • Require periodic re-authentication for sensitive applications

To create a conditional access policy, navigate below to Conditional access and click on “Create new policy” and name it. In my example here, I selected a group and then chose Office 365 as the target as shown below.


One of the purposes of this conditional access policy is to scrutinize all the login attempts from off prem locations. By excluding trusted networks from the policy, we maintain seamless access for users on known secure networks while enforcing additional security measures for connections from elsewhere.

For this configuration to be effective, trusted network locations must be pre-defined in the Microsoft Entra admin center. These typically include:

  • Corporate office network ranges
  • Known VPN network ranges
  • Other verified secure networks

The screenshot demonstrates this configuration:

I then created two conditions that must be met to grant access:

  1. Require multifactor authentication (MFA) only for off-premises access attempts. Users accessing resources from within the corporate network (on-premises) will not need to go through MFA.
  2. Require that all computers must be compliant with the organization's policies to prevent employees from logging in using personal, potentially unsecured devices when off-prem. The associated compliance policy created earlier ensures that off-premises devices meet the same operating system and Microsoft Defender for Endpoint requirements as on-premises users.

The selections are shown in the screenshot below:

Conclusion

Of course, I have only scratched the surface here of possibilities. The configurations discussed here represent just a small sample of Intune's extensive security capabilities. Conditional Access and compliance policies can be customized with numerous additional controls and requirements to match your organization's specific security needs and risk tolerance. As threats evolve and organizational requirements change, these policies can be adjusted and you should regularly review and update your policies. By leveraging the full potential of Intune's policy framework, organizations can build a dynamic, responsive security posture that aligns with the principles of zero trust while enabling a modern, flexible workplace.


Dec 2024
23

Use Device Categories to Organize and Manage Devices in Intune

If you have ever created a Device Configuration Policy with Microsoft Intune, you may have noticed a Menu Item called “Device Categories.” Device categories They provide a way to group devices based on specific criteria so you can deploy special policies for designated departments. Categories can be based on various factors such as device type, department, or location. For instance,

  • Sales devices need a CRM app installation as well as VPN configuration
  • Finance devices require stricter security and encryption policies as well as financial software deployment
  • Marketing Devices need social media management tools and content creation software deployment

By categorizing devices, your organization can ensure that sensitive departments like Finance have appropriate security measures in place. Device categories allow administrators to quickly apply policies to specific departments or device types without manual assignment. When users enroll their devices, they can select a category, which automatically adds the device to the corresponding group in Intune. Let’s say you ship your sales personnel new laptops. During the enrollment process of their new device, users can choose the appropriate category, reducing administrative overhead.

Creating a Device Category

To create or edit a device category, you must be a Global Administrator or Intune Administrator. Using the Microsoft Intune Admin Center, navigate to Devices > Device Categories > click Create device category. Enter a name for the new device category and add an optional description as shown in the screenshot below.

You can add an optional tag in the next step and then verify your settings on the Review + Create tab. Once the device category is created, you will see it in your list of device categories. Devices can be assigned to categories manually or you can allow users to make their selection during enrollment.

In addition to setting up device configurations, you can set up corresponding dynamic Azure AD groups. These dynamic groups can automatically add or remove members based on specified criteria


Dec 2024
16

The Many Ways to Block Access to Windows Command Prompt using Intune or Group Policy

Since the early days of Group Policy, I have been talking about the importance of blocking Windows command prompt for non-administrative users. While it is an essential tool for IT personnel, in the wrong hands, the command prompt can be used to execute potentially harmful commands, access sensitive system files, modify system settings, run malicious scripts, or launch programs that could compromise system integrity. Even barring malicious intent, preventing access helps maintain system stability by preventing accidental misuse of powerful command-line tools that could disrupt operations or expose confidential data.

While the objective may be the same, there are multiple methods to implement this policy in modern IT environments. Let’s explore the various ways to achieve this security measure using Group Policy, Microsoft Intune and the Intune Education portal.  

Using Group Policy

The way to block access to Windows Command Prompt using Group Policy hasn’t changed at all over the years. It is still a straightforward approach. Simply create a new GPO and navigate to User Configuration > Administrative Templates > System > and enable the policy setting “Prevent access to the command prompt" as shown in the screenshot below:

Note that the setting, “Prevent access to registry editing tools” has been enabled which as well and is highly recommended.

Using Intune Settings

Settings Picker

When we start talking about Microsoft Intune, there are multiple ways to block access. The simplest approach is to use the Settings Catalog Configuration Profile. Using the Microsoft Intune admin center, navigate to Devices > Configuration > Create > New policy. Choose Windows 10 and later as the Platform and Settings catalog as the Profile type. Do a search for “CMD” and browse Administrative Templates\System. Then enable the “Prevent access to the command prompt (User)" setting” and choose the “Disable the command prompt script processing also? (User)" if desired. These steps are outlined in the screenshot below.

Note that until December 2024 you could use Administrative Templates to create a new configuration profile to block CMD access. Microsoft has now phased out the use of Administrative Templates for creating new configuration profiles to block CMD access.

OMA-URI Settings

You can also create a Configuration profile using OMA-URI settings. Here are the settings:

  • OMA-URI path:  ./User/Vendor/MSFT/Policy/Config/ADMX_ShellCommandPromptRegEditTools/DisableCMD
  • Data type: Integer
  • Value: 1 (to block) or 2 (to block and disable scripting)

See the screenshot below for an example:

AppLocker Settings

If you've already created an AppLocker Group Policy that successfully blocks the CMD prompt, you can leverage this existing configuration in Intune. Extract the XML content from your Group Policy and deploy it through Intune using OMA-URI settings.

  • OMA-URI: ./Vendor/MSFT/AppLocker/ApplicationLaunchRestrictions/apps/EXE/Policy
  • Data type: String
  • Value: (Paste the XML content of your AppLocker policy here)

Education Portal Method

Some educational institutions with limited IT resources opt for the Education version of Microsoft Intune. This simplified platform is designed to be more accessible, allowing staff members with basic technical knowledge, such as teachers with some IT background, to manage and implement fundamental Mobile Device Management (MDM) policies.

You can access the Intune Education portal at (https://intuneeducation.portal.azure.com/). Then navigate to Groups > All Devices > Settings > Windows Device Settings > Apps. Use the "Block Access to Administrative Apps" option as shown in the screenshot below.

Note that by default, this setting also blocks access to other system apps such as PowerShell and regedit.

Dec 2024
02

Intune Administrative Templates are Now Retired

If you have recently attempted to make Intune configuration profiles using the tried-and-true Administrative Templates, you may have stumbled upon a surprise. A "(retired)" tag is now visible next to Administrative Templates, and the Create button is greyed out as shown in the screenshot below.

After all these years, Administrative Templates are being retired in Microsoft Intune. This means you can no longer create new Administrative Templates configuration profiles through the path: Devices > Configuration > Create > New policy > Windows 10 and later > Administrative Templates. Users will now be directed to use the Settings Catalog instead which hosts the same settings found in Administrative Templates.

Existing Administrative Templates can still be viewed, updated, and deleted so you can still fully utilize any configuration policies you have made in the past. The retirement of Administrative Templates does not affect other templates, which will continue to be supported.

Nov 2024
22

The Many Ways to Configure Windows Firewall Rules using Intune or Command Line

The Many Ways to Configure Windows Firewall Rules

In today's rapidly evolving threat landscape, organizations must prioritize a multilayer security strategy. That includes configuring and enforcing Windows Firewall on servers and workstations. In this article we will look at the multiple ways to deliver Windows Firewall settings to your Windows devices.

Using Intune

There are a several ways to configure Windows Firewall Rules and enforce them using the Microsoft Intune Admin Center. One way is to navigate to Endpoint Security > Firewall and click “Create Policy.” Then choose “Windows” as the Platform and then choose one of the two Profile options:

Windows Firewall: Choose this option to enable or disable the Windows Firewall for different network profiles and only need basic firewall settings and configurations.

Windows Firewall Rules: Use this option if you already have Windows Firewall enabled and you want to create granular custom firewall rules for inbound and outbound traffic.

In the example below I chose Windows Firewall.

You then have the option to enable or disable the Windows Firewall for Domain, Private or Public Networks. If you aren’t sure which profile to choose, here are some tips:

  • The Domain profile in Windows Firewall is applied when a computer is connected to a network that is identified as a Domain Network. The Domain profile takes precedence over Private and Public profiles when connected to a domain network and is typically more permissive than the Public profile, as the domain network is assumed to be trusted and secure.
     
  • The Network private profile is for networks in which devices are visible to one another on the same network. Network discovery is usually enabled and file and printer sharing features are active. This profile is typically used for SOHO environments.
     
  • The Public profile is designed for use on untrusted networks such as an establishment that provides a public or guest network. The devices are not discoverable by other devices on the network stricter firewall rules are applied to limit incoming connections.

You can then configure basic settings for each of these profiles as shown below. Here I chose to enable the Public Network.

Choosing the Windows Firewall Rules option I outlined earlier provides you with a different interface to select more customized rules as shown in the screenshot below.

Clicking the Edit instance will prompt you with the port configuration settings.

You can also configure Windows Firewall using Intune Configuration profiles. Navigate to Devices > Configuration Profiles and create a new profile. Select Windows 10 and later as the platform. Then choose Endpoint protection as the profile type as shown below.

Name the profile and then proceed to the next screen where once again, you can configure basic settings for the Domain, Private and Public profiles.

Another approach to configuring firewall rules with Intune is to use PowerShell Script Deployment. This method leverages NetFirewallRule cmdlets to define firewall rules as is shown below:

New-NetFirewallRule -DisplayName "Allow Inbound Port 80" -Direction Inbound -LocalPort 80 -Protocol TCP -Action Allow

You would then use the Microsoft Win32 Content Prep Tool and package it into an .intunewin file. You can download the Win32 Content Prep Tool from Microsoft's official GitHub repository. Then go to the Microsoft Intune Admin Center and navigate to Apps > Windows > and add a new Windows app (Win32). Then upload the .intunewin file and set the following install command:

powershell.exe -executionpolicy bypass -file .ps1

Whichever option you choose to deliver the Firewall settings, you would then assign the profile to the designated groups you want to target and then save it.

Using Group Policy

If you want to configure Firewall settings for domain-joined computers, then Group Policy is the best option. Using the Group Policy Management Console, create a new GPO and navigate to Computer Configuration > Policies > Windows Settings > Security Settings > Windows Defender Firewall with Advanced Security. You can enable your desired network profiles by right-clicking on "Windows Defender Firewall with Advanced Security" and selecting "Properties.” To add rules, you would expand either "Inbound Rules" or "Outbound Rules" and right-click and select "New Rule.” Then simply follow the wizard to define the ports, programs or custom rules you want as shown below.

Ultimately, whether using Intune or Group Policy, the goal remains the same: to protect critical assets from unauthorized access and potential threats while maintaining seamless operational efficiency. Stay safe out there.


Nov 2024
18

Setting up Autopilot in Intune for Streamlined Device Deployment

Whether you are onboarding laptops for new employees that work in a remote office or executing a large-scale refresh for employees or students, the manual effort required to configure each device can drain IT resources, disrupt productivity, and create inconsistent user experiences. If your computers are going to be integrated within Azure AD however, there is a simpler way that streamlines the process.

Windows Autopilot is a cloud-based Microsoft solution that simplifies and automates the deployment and configuration of new Windows devices. By leveraging the OEM-installed version of Windows, Autopilot gives you true zero-touch deployment.

Key benefits of Windows Autopilot include:

  1. Zero-touch deployment: Devices ship directly to end-users, eliminating IT intervention.
  2. No OS re-imaging: Autopilot automates app installation, driver setup, and policy configuration.
  3. Enhanced productivity: Reduced setup time allows employees to start work sooner.
  4. Customized experience: Pre-configured settings and branding personalize the out-of-box experience (OOBE).
  5. Simplified redeployment: Devices can be easily wiped and reconfigured for new users.

Zero touch deployment includes things such as automatic Azure AD or Hybrid Azure AD join, MDM auto enrollment, local administrator account restrictions, dynamic group assignments, and device resets.

Windows Autopilot is managed using Microsoft Intune. It is here where you can register devices, create deployment profiles, assign them to Azure AD groups, configure settings for the out-of-box experience (OOBE) and establish compliance policies and application deployments.

What are the requirements for Autopilot?

While there is no specific "Windows Autopilot license" its functionality can be enabled through one of the following plans:

  • Microsoft Intune Plan 1
  • Microsoft 365 Business Premium
  • Microsoft 365 Enterprise E3 or E5
  • Microsoft 365 Education (Academic) A1, A3, or A5
  • Microsoft 365 F1 or F3
  • Enterprise Mobility + Security E3 or E5

What operating systems support Autopilot?

  • Windows 10 and 11 Pro
  • Windows 10 and 11 Pro for Workstations
  • Windows 10 and 11Enterprise
  • Windows 10 and 11 Education
  • Windows 10 Enterprise 2019 LTSC

Autopilot works with Entra ID, formerly Azure AD. The device IDs for any computer that will participate in Autopilot will have to be uploaded to your Entra ID ahead of time. Some OEMs will work in cooperation with you, so they are ready to go upon delivery. You can also add the computers yourself by capturing the device information and uploading it in a CSV file. You can obtain the hardware hash and serial number using the Get-WindowsAutopilotInfo.ps1and saving the captured information in a CSV file which you can then import into Intune.

To upload the CSV file Microsoft Intune Admin Center you navigate to Devices > Enroll Devices > Windows enrollment. In the Windows Autopilot Deployment Program pane, select Devices and then click Import and select a CSV file containing device information. An example is shown below although the serial numbers have been hidden.

Create an Autopilot Profile

Once the computer hardware information is uploaded to Entra ID, it is time to create an autopilot profile. Navigate to Windows > Windows enrollment > Deployment profiles as shown in the screenshot below.

Click Create profile and choose Window PC. Then provide a name for the profile. In the next window you will configure the settings for the out-of-box experience as shown in the screenshot below.

In most cases you will choose User-Driven for the Deployment mode as this is for is for end users who will log in with their Azure AD credentials. You could choose Self-Deploying for kiosks or shared devices that don’t require user interaction. Once you have your desired settings, you can assign the profile to your desired groups.

Before initiating the Autopilot deployment, you will create the necessary configuration profiles and application profiles in Intune. These profiles will define the settings, policies, and applications that will be applied to devices during the Autopilot process, ensuring a consistent and secure setup for all deployed devices.

Setup and Enrollment Status Page

While it isn’t required, you can set up an Enrollment Status Page to track device enrollment progress and ensure all required applications are installed before users access the desktop. This is done by navigating to Devices > Enrollment > Windows enrollment and click "Create" to set up a new ESP profile. Here you can configure settings such as:

  • show app and profile configuration progress
  • Block device use until all apps and profiles are installed
  • Specify required apps that must be installed before users can access the desktop
  • Set time limits for installation and error handling

An example is shown in the screenshot below.

Like all profiles, you would then assign the ESP profile to your target user or device groups.

Testing your Autopilot Deployment

Of course, it is highly recommended that you test all of this on a few sample devices to ensure proper functionality. When a registered device connects to the internet it should automatically begin the Autopilot process, prompting user sign-in with Azure AD credentials and applying configurations as per the assigned profile.


Nov 2024
04

Managing Device Addition Limits in Intune

If you are an AD administrator, you're likely aware that Active Directory (AD) typically limits users to adding 10 devices to a domain by default. For Azure AD, the default limit is higher, maxing out at 50 devices per user. Domain admins and global administrators are usually exempt from these limitations. However, there may be situations where you need to allow lower-level IT staff or other personnel to add more devices than the default limit allows, or you may need to modify the device limit or restrict it further for Azure AD users.

To Modify the restriction in on-prem AD, there is no Group Policy to do it. Instead you have to:

  • Use Active Directory Users and Computers and right-click on the domain name at the top
  • Select Properties.and go to the Attribute Editor tab.
  • Find the ms-DS-MachineAccountQuota and change its value to the desired number of devices

In the example below, I have raised the number to 20.

Restricting Ordinary Users to 15 Devcies or Less for Azure

If you want to limit the number of device enrollments for ordinary users in Azure AD, you can do so using Microsoft Intune. Here's how to set up device enrollment restrictions:

  1. Access the Microsoft Intune Admin Center
  2. Navigate to either:
    • Devices > Enrollment restrictions, or
    • Devices > Windows > Enrollment restrictions
  3. Click on "Device limit restrictions"
  4. Select "Create restriction"
  5. In the settings, you can choose a limit between 1 and 15 devices per user as shown below:

Then complete the policy by assigning the groups or users to it and finish out the wizard. If you want to make the restriction greater than 15, you will have to do so using the Microsoft Entra Admin Center and navigate to Devices > Device Settings. The available options are shown in the screenshot below.

Windows Autopilot

For large organizations, school systems implementing one-to-one device programs for students, or companies with numerous remote workers, Windows Autopilot offers a more efficient alternative to manually adding devices to Azure. This cloud-based solution streamlines the process of setting up and pre-configuring new Windows devices and ensure they are business-ready without requiring hands-on IT involvement. Autopilot automates device registration, configuration, and enrollment into Azure AD and Intune.

When a user receives a device, they simply connect it to the internet and log in with their corporate credentials. Autopilot automatically configures the device based on its assigned profile, installing necessary applications and applying company policies. This zero-touch deployment approach eliminates the need for IT to manually prepare each device, making the process faster and more scalable across the organization.

You can create the necessary Autopilot profiles using Intune which I will cover in a future blog.

Oct 2024
21

6 Essential One Drive Settings in Intune and Group Policy

There are a few key items you'll likely want to tune in OneDrive settings before setting it loose in your environment. As such. Microsoft gives you the ability to manage Intune settings in both Group Policy and Intune. Those settings are: 

  • Prompt users when they delete multiple OneDrive files on their local computer
  • Warn users who are low on disk space
  •  Silently sign in users to the OneDrive sync app with their Windows credentials
  •  Use OneDrive Files On-Demand and Coauthor and share in Office desktop apps (User).

To configure OneDrive settings using the Microsoft Intune Admin Center., navigate to Devices > Configuration > Create New Policy in the Microsoft Intune Admin Center. When creating the policy, select "Windows 10 and later" as the Platform and "Settings catalog" as the Profile type. After naming the policy, type "OneDrive" into the Settings picker and select the OneDrive options. You can then choose which of the settings you want to include in the policy as shown in the screenshot below. In this example, I have chosen six settings that serve important functions in OneDrive.

  1. Prompt users when they delete multiple OneDrive files on their local computer

This is a data protection feature designed to prevent unintended bulk file deletions in OneDrive. When enabled, this setting triggers a warning prompt if a user attempts to delete multiple OneDrive files simultaneously. If a user tries to delete a large number of files larger at once that is larger than the configured threshold, they will see a pop-up message asking them to confirm the deletion action. The setting includes a configurable threshold that you can set to trigger the prompt as shown in the screenshot below.

        2. Warn users who are low on disk space

This setting monitors the local disk space on a user's device to prevent them from unexpectedly running out of storage, which could impact their ability to sync OneDrive files. It includes a configurable threshold, specified in GB, that triggers a warning notification to users when their available disk space falls below this set level as shown here below:

3. Silently sign in users to the OneDrive sync app with their Windows credentials

When enabled, this setting automatically authenticates users with their existing Windows login information to ensure a seamless Single Sign-On (SSO) experience, thus eliminating the need for manual credential entry.

4. Silently move Windows known folders to OneDrive

When enabled, this setting automatically redirects a user’s Windows known folders (such as Documents, Pictures, and Desktop) to OneDrive without user intervention. This aids in ensuring that important files are automatically backed up to the cloud by moving the contents of these folders to OneDrive. Once enabled, you must provide your tenant ID as shown below.

       5. Use OneDrive Files On-Demand

When enabled, this setting allows users to see and interact with all their OneDrive files in File Explorer without downloading them all to their device. Files are downloaded only when opened, which saves local disk space. Users can choose to make specific files or folders always available offline.

       6. Coauthor and share in Office desktop apps (User)

When enabled, this setting allows users to simultaneously work on the same document with colleagues, allowing users to edit them and see each other’s changes in real-time.

Using Group Policy

You can also manage these settings using Group Policy.  Five of the above settings are from the computer side. Navigate to Computer Configuration > Administrative Templates > OneDrive and enable any of the five settings shown in the screenshot below. Here, I have highlighted the “Prompt users when they delete multiple OneDrive files on their local computer” setting.

The remaining setting, “Coauthor and share in Office desktop apps (User)” is a user side setting. Navigate to User Configuration > Administrative Templates >OneDrive and enable the setting as shown in the screenshot below.

The remaining setting, “Coauthor and share in Office desktop apps (User)” is a user side setting. Navigate to User Configuration > Administrative Templates >OneDrive and enable the setting as shown in the screenshot below.


Oct 2024
07

How to Disable Windows Shortcut Keystrokes using Group Policy and Intune

Windows shortcut keys are pre-defined keyboard combinations that allow users to perform various tasks and functions quickly and efficiently within the Windows operating system. Shortcut keys enable users to execute commands and navigate the system faster than using a mouse or touchpad. Windows shortcut keys may provide an alternative way to execute commands or access system functions that are normally restricted or blocked through traditional menus and interfaces. That’s why in some cases, it may be worthwhile to disable Windows keystrokes all together. You can do this using either Group Policy or Intune.

Disabling Windows Shortcut Keys using Group Policy

To disable Windows shortcut keystrokes in Group Policy you can create a GPO using the Group Policy Management Console. Then use Group Policy Editor and navigate to User Configuration > Administrative Templates > Windows Components > File Explorer and enable the policy setting titled “Turn off Windows key hotkeys” as shown in the screenshot below.

Then assign the GPO to the applicable users or groups.

Disabling Windows Shortcut Keys using Intune

You can also achieve the same result using the Microsoft Intune Admin Center. Navigate to Devices > Configuration profiles and click on create profile. Select Windows 10 and later as the platform and choose the Custom template. Enter a name for the profile and then add the following OMA-URI settings:

  • Name: Enter a name for the setting.
  • Description: Provide a description (optional).
  • OMA-URI: ./Device/Vendor/MSFT/Policy/Config/KeyboardFilter/Enable
  • Data type: Select Integer.
  • Value: Enter 1 to enable Keyboard Filter.

Then assign the policy towards the designated users or groups and save it.