

Use Intune to Deploy Microsoft Take a Test
Many K12 school districts are concerned about providing a secure environment for online testing. The integrity of online testing relies on the ability to prevent students from opening a new browser tab to google for answers or copy exam question text to an archive. Take a Test is a secure browser provided by Microsoft that can be set up to only provide access to a single URL or a list of URLs. Students cannot perform the following actions when taking an exam using Microsoft Take a Test:
- Access other applications
- Open another browser tab
- Print or use screen capture
- Change system settings
- Access Cortona
- Access content copied to the clipboard
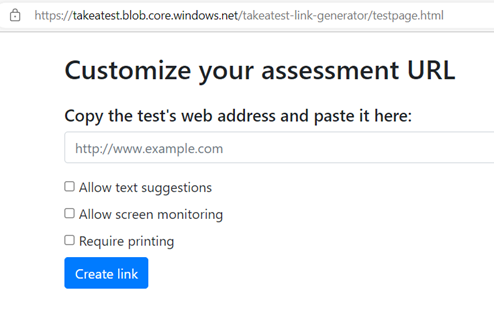
Microsoft Take a Test is a secured instance of Intune, not an application. There are 2 modes for Microsoft Take a Test. The first is intended for a brief test or quiz that a teacher might wish to administer. By creating a secure assessment URL and sending it to students via email or OneNote, teachers may accomplish this task quickly and easily. The assessment link is constructed in three stages using Microsoft's secure link generator.
- Paste the link to the assessment URL
- Select the options you want to allow during the test
- Generate the link by selecting the button Create link
Below is a screenshot of the secure generator page.
When the students click on the link, Edge will open a secure test taking session for the student to take the exam. Keep in mind that the student must be logged on to a Windows machine already. This deployment method would be a challenge for a large-scale exam such as a high school proficiency or college entrance exam. This is where the Take a Test in Kiosk Mode is better suited. This mode can be deployed using either regular Intune or Intune Education edition.
Intune Education edition is specifically designed to meet the needs of schools and provides a simpler interface than regular Intune. Intune Education edition is the easiest way to deploy Take a Test in kiosk mode as the settings are available in the menu interface. To configure devices for Take a Test, go to Groups and select a group to configure Take a Test for. Then go to Windows device settings > Take a Test profiles and select “Assign a new Take a Test profile. Here you will specify a Profile Name, Account Name, Assessment URL, and an option Description. Finish it by selecting Create and assign profile as shown in the screenshot below.
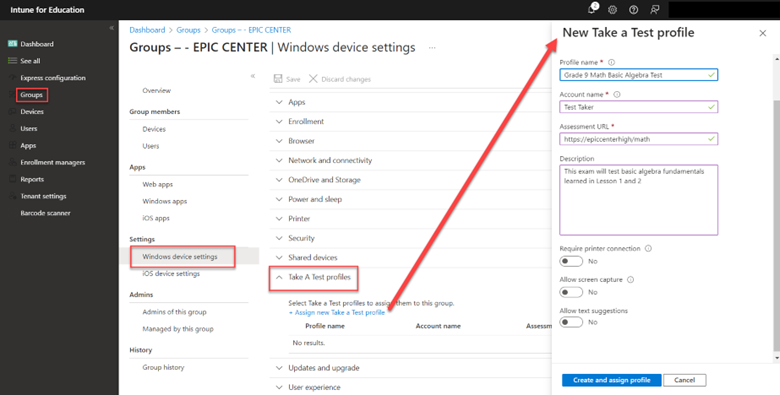
Once deployed, test takers can log on to a Windows machine using the test taker profile. They will only be able to access the test in a single browser session.
You can also deploy this mode using regular Intune as well although it is a little messier because you must provide the following OMA-URI settings as shown below.
OMA-URI:
./Vendor/MSFT/Policy/Config/LocalPoliciesSecurityOptions/InteractiveLogon_DoNotDisplayLastSignedIn

Data Type: Integer

Value: 1
OMA-URI:
./Vendor/MSFT/Policy/Config/WindowsLogon/HideFastUserSwitching
Data type: Integer
Value: 1
OMA-URI: ./Vendor/MSFT/SharedPC/AccountModel
Data type: Integer
Value: 1
OMA-URI: ./Vendor/MSFT/SharedPC/EnableAccountManager
Data type: Boolean
Value: True
OMA-URI: ./Vendor/MSFT/SharedPC/KioskModeAUMID
Data type: String
Value: Microsoft.Windows.SecureAssessmentBrowser_cw5n1h2txyewy!App
OMA-URI: ./Vendor/MSFT/SharedPC/KioskModeUserTileDisplayText
Data type: String
Value: Take a Test (or a string of your choice to display in the sing-in screen)
OMA-URI: ./Vendor/MSFT/SecureAssessment/LaunchURI
Data type: String
Value:
The screenshot below shows all OMA-URIs fully inputted.
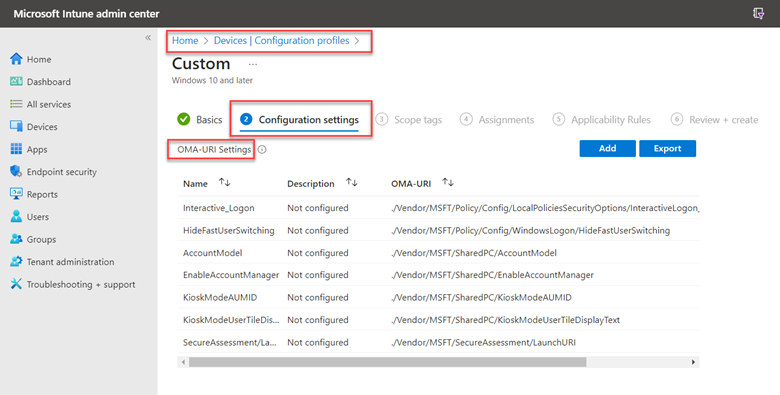
Finish the creation wizard out by assigning the configuration profile to a group and you are done. Students will again only have access to the active test session in a locked down desktop environment.

Comments (0)