
Feb 2025
03

To purchase about a Live Group Policy Class (Public or Private), or the Group Policy Health Check, please call Jeremy at 302-351-8408 or email register[[att]]moskowitz-inc.com
Get serious, and perform “Best Practices” around Group Policy management. Take back control and get your IT life back!
| Dates | Class | Actions |
|---|---|---|
| No Public Classes Scheduled | ||
Call if you have 3 or more people to help us get started! In the meantime, click here to checkout our Online Class
There are two different types of groups you can create with Intune. The first is the traditional “Assigned Group” in which administrators manually add or remove members. This means of course that group membership only changes when an administrator makes a change. These are best for small organizations or small stable groups within a larger enterprise.
“Dynamic Groups” offer an automated approach to group management, where membership is determined by specific query rules and conditions. Here, members are added or removed in real-time as they meet or no longer meet the specified criteria. These are ideal for large enterprises, large groups that change membership, or large-scale deployments based on departments, locations, or device types.
There are two ways to create dynamic groups. The first is using the Microsoft Intune admin center and navigating to Groups and select “New group.” On the next page you will create a name for the Group and state whether it is an Assigned or Dynamic group. In the screenshot below, I have selected Dynamic Device.
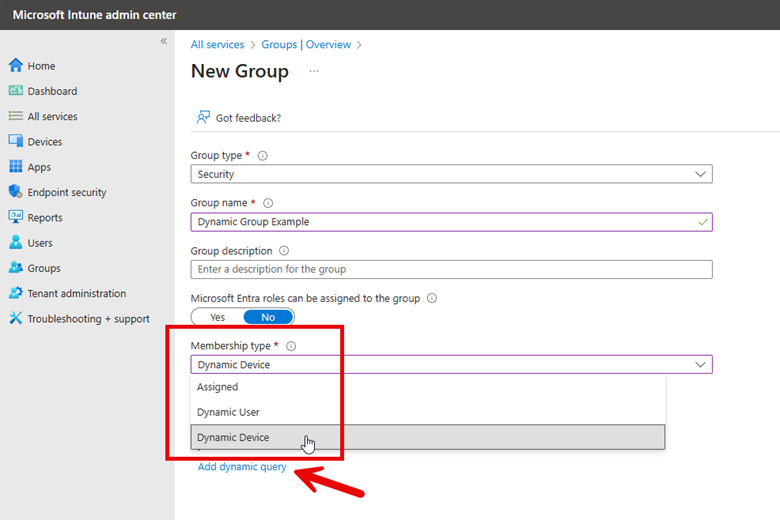
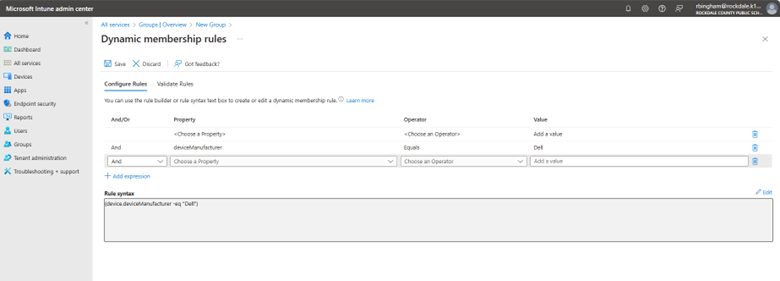
Now I need to create a dynamic query which will dictate the membership criteria. The screenshot above shows the “Add dynamic query” links that takes me to where I will create the Dynamic membership rules. Here you will use the wizard to create the rules that are comprised of properties, operators and values. You can add as many expressions as you want.
Here are some examples of possible groupings you can do:
Dynamic Group Validation
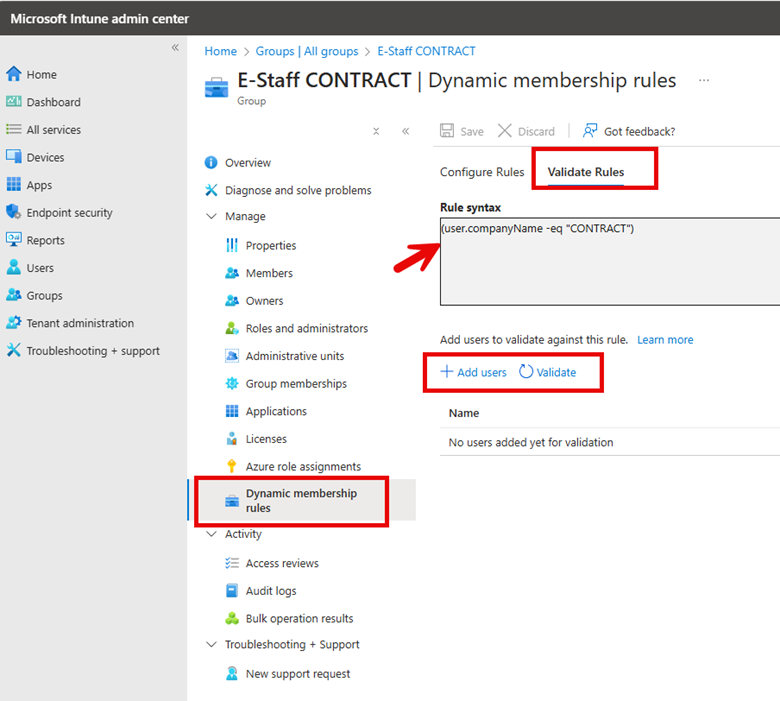
Before using new dynamic groups in a production environment, you should validate the rules to confirm that the dynamic rule results operate as expected. To do this, go to Groups in the Microsoft Intune admin center, select the group you want to validate, and navigate to the Dynamic membership rules section. Click "Validate Rules", add users or devices that should be included in the group, and then click "Validate" to confirm the proper assignment. The screenshot below outlines these steps.
Note that dynamic groups don't update instantly and may take up to 24 hours to process changes.
I mentioned there are two ways to create and validate Dynamic Groups because you can also use the Microsoft Entra ID portal using the exact steps I used in Intune. You can also use PowerShell to validate dynamic group membership using the following cmdlet:
$GroupID = "
$UserID = "
Get-MgGroupMember -GroupId $GroupID | Where-Object { $_.Id -eq $UserID }
If the output is empty, the user or device is not part of the group, meaning the rule might need adjustments.
As organizations continue to grow and evolve, the ability to automatically manage group memberships based on specific attributes becomes a necessity for maintaining security, compliance, and operational efficiency. By leveraging rule-based membership, these groups significantly reduce administrative overhead while ensuring that access controls, policy applications, and resource distributions remain current and accurate.
Enterprise cloud accounts, particularly services like Office 365, face constant cybersecurity threats from malicious actors. While enforcing strict password complexity requirements can help protect these accounts, this approach alone has significant limitations. Complex passwords may lead users to create workarounds that actually reduce security such as writing passwords down or reusing them across multiple accounts. There is also a linear correlation that as password complexity increases, organizations typically see a corresponding rise in password-related help desk tickets, increasing IT support costs and reducing productivity.
However, even properly authenticated users can pose security risks when accessing systems from compromised devices. Organizations need to prevent access from endpoints that have security vulnerabilities or malware infections, regardless of valid user credentials. Of course, when users are accessing resources from their home, you can’t be sure what type of device they may be using.
If you use Microsoft Intune to manage your user accounts, you can leverage two key policy types working in tandem: Conditional Access policies and compliance policies. When implemented together, these policies ensure organizational resources are only accessible from devices that meet your security requirements. Conditional Access policies define the circumstances under which access is permitted, while compliance policies establish the security standards devices must maintain.
Compliance policies in Microsoft Intune are sets of rules and conditions used to evaluate the configuration of your managed devices. These policies help secure organizational data and resources by ensuring devices meet specific configuration requirements. Devices must satisfy the conditions set in these policies to be considered compliant by Intune such as:
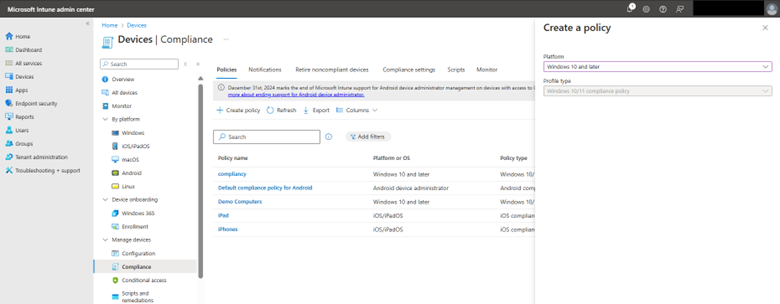
To create a compliance policy in the Microsoft Intune Admin Center, navigate to Devices > Compliance and select “Create Policy” as shown in the screenshot below.
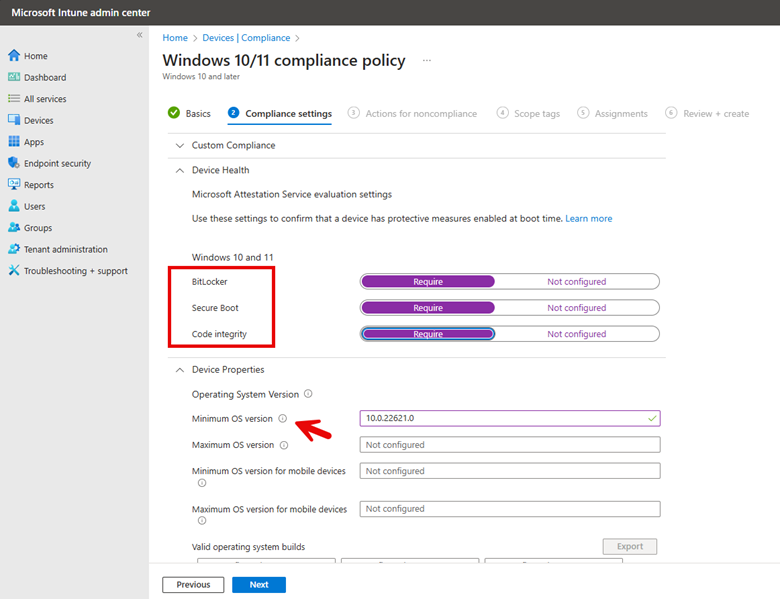
Name your policy and then choose the compliance settings you want. In the example below, I want all compliant machines to have BitLocker, Secure Boot, and Code integrity enabled. Because all my employees are running machines with Windows 11, version 22H2, I chose that as the minimum operating system to be compliant. For the minimum operating system version in Intune, you would specify:
Minimum OS Version: 10.0.22621.0
This corresponds to Windows 11, version 22H215. By leaving the maximum OS version blank, you are allowing those with later versions access. See the screenshot below.
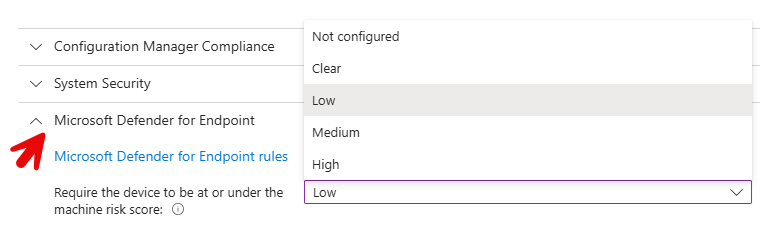
Because I am running Microsoft Defender for Endpoint on employee machines, I will configure Microsoft Defender for Endpoint rules in the compliance policy. Here, I am requiring that all devices be at or under a machine risk score of Low. This means that Devices with "Medium" or "High" risk scores will be marked as noncompliant.
The compliance policy will immediately mark the device as noncompliant when any one of these conditions is not met. On the next screen, you can configure additional Actions for noncompliance, such as sending email notifications to users or remotely locking devices. For this example, I am going to skip this section and proceed to apply the policy to all users and groups.
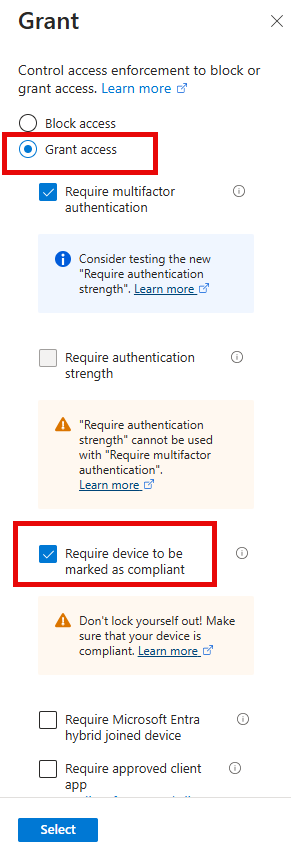
Conditional access policies serve as a type of gatekeeper for designated resources of your organizations. These policies make real-time decisions about whether to grant, limit, or block access to resources based on specific conditions. You can create policies that do things such as:
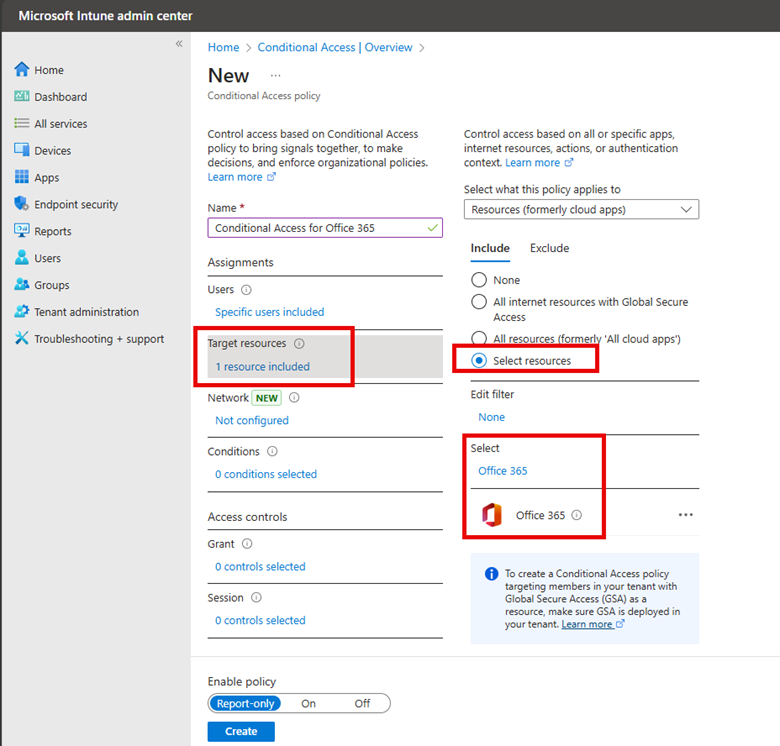
To create a conditional access policy, navigate below to Conditional access and click on “Create new policy” and name it. In my example here, I selected a group and then chose Office 365 as the target as shown below.
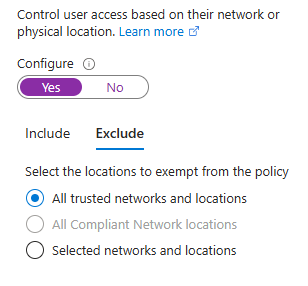
One of the purposes of this conditional access policy is to scrutinize all the login attempts from off prem locations. By excluding trusted networks from the policy, we maintain seamless access for users on known secure networks while enforcing additional security measures for connections from elsewhere.
For this configuration to be effective, trusted network locations must be pre-defined in the Microsoft Entra admin center. These typically include:
The screenshot demonstrates this configuration:
I then created two conditions that must be met to grant access:
The selections are shown in the screenshot below:
Of course, I have only scratched the surface here of possibilities. The configurations discussed here represent just a small sample of Intune's extensive security capabilities. Conditional Access and compliance policies can be customized with numerous additional controls and requirements to match your organization's specific security needs and risk tolerance. As threats evolve and organizational requirements change, these policies can be adjusted and you should regularly review and update your policies. By leveraging the full potential of Intune's policy framework, organizations can build a dynamic, responsive security posture that aligns with the principles of zero trust while enabling a modern, flexible workplace.
Group Policy and Mobile Device Management (MDM) solutions like Microsoft Intune both experience a time lag between policy creation or modification and its deployment to target devices. This delay is an inherent characteristic of centralized management systems:
Group Policy:
Microsoft Intune:
In certain situations, waiting for standard Group Policy refresh intervals isn't practical, particularly when immediate policy updates are crucial. For example, when implementing a new GPO to address an emerging security threat, or when troubleshooting requires immediate policy changes affecting permissions. While it may be feasible to use Remote Desktop Protocol (RDP) to connect to critical servers and manually update policies via command prompt, this approach isn't always efficient or scalable.
A simple method to force Group Policy updates is through the Group Policy Management Console (GPMC). By right-clicking on an organizational unit and selecting "Group Policy Update," administrators can trigger an immediate policy refresh. When selected, a confirmation dialog appears as shown in the screenshot below.
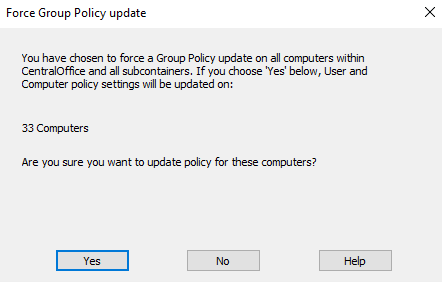
Confirming this prompt will force all computers within the selected organizational unit to immediately update their Group Policy settings.
If you have Microsoft Endpoint Configuration Manager (formerly SCCM) in your environment, you can use it to trigger gpupdate as well using the management console.
Another alternative for forcing gpupdates on remote computers is to use the Invoke-GPUpdate command in PowerShell. The example below shows the command if you wanted to update the Group Policy on the local computer.
Invoke-GPUpdate -Force
The commnd template below shows how to force GPUpdates on a remote computer.
Invoke-GPUpdate -Computer "ComputerName" -Force -RandomDelayInMinutes 0
Here's a breakdown of the key parameters:
For example, to force a Group Policy update on a computer named "COMPUTER02", you would use:
Invoke-GPUpdate -Computer "COMPUTER02" -Force -RandomDelayInMinutes 0
To apply updates on more than one remote computer, you can do this:
# Define the target computer(s)
$computers = @("Computer1", "Computer2")
# Run gpupdate remotely on the target computers
Invoke-Command -ComputerName $computers -ScriptBlock {
gpupdate /force
}
You can also use a loop or pipeline as shown in the example below:
$computers = "Computer1", "Computer2", "Computer3"
$computers | ForEach-Object { Invoke-GPUpdate -Computer $_ -Force -RandomDelayInMinutes 0 }
Note that when the gpupdate command is run remotely, the remote clients will briefly see a CMD screen pop-up notifying them of the Group Policy update
If you aren’t in a hurry to deploy group policy updates but instead want to schedule GPUpdates at a precise time for designated machines, you can use Task Scheduler. Simply configure the task to run the gpudate command and deploy the task to the remote machines via Group Policy, PowerShell, or other deployment tools.
If you have ever created a Device Configuration Policy with Microsoft Intune, you may have noticed a Menu Item called “Device Categories.” Device categories They provide a way to group devices based on specific criteria so you can deploy special policies for designated departments. Categories can be based on various factors such as device type, department, or location. For instance,
By categorizing devices, your organization can ensure that sensitive departments like Finance have appropriate security measures in place. Device categories allow administrators to quickly apply policies to specific departments or device types without manual assignment. When users enroll their devices, they can select a category, which automatically adds the device to the corresponding group in Intune. Let’s say you ship your sales personnel new laptops. During the enrollment process of their new device, users can choose the appropriate category, reducing administrative overhead.
To create or edit a device category, you must be a Global Administrator or Intune Administrator. Using the Microsoft Intune Admin Center, navigate to Devices > Device Categories > click Create device category. Enter a name for the new device category and add an optional description as shown in the screenshot below.
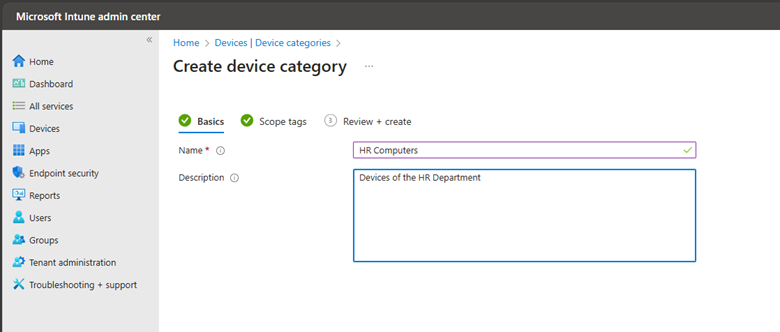
You can add an optional tag in the next step and then verify your settings on the Review + Create tab. Once the device category is created, you will see it in your list of device categories. Devices can be assigned to categories manually or you can allow users to make their selection during enrollment.
In addition to setting up device configurations, you can set up corresponding dynamic Azure AD groups. These dynamic groups can automatically add or remove members based on specified criteria
After taking Jeremy’s Group Policy Class, my staff and I were able to reduce the number of help desk calls dramatically! Thank you Jeremy!
MCSE Systems Administrator, Royal Canin USA, Inc
If you want to learn everything about Group Policy, then you need to attend Jeremy’s training class, I came in as a novice and left an expert. Jeremy speaks to you, not above you.
Desktop Computing Specialist, Princeton University
Jeremy is absolutely the best presenter and instructor I have seen. I really would like to get the same type of instruction for other IT courses. He has a wonderful way of sharing his knowledge in a simple, effective way that leaves you thinking “Wow! That makes so much sense. ” After taking his “Group Policy Online University” courses and reading his books I feel like a pro — truly understanding Group Policy. And whenever I have a question, Jeremy is always there to help. I really liked the fact you can review the online course TWICE. It’s almost like getting TWO courses in one. Add in his weekly tips and simply you can’t go wrong. Thanks Jeremy — and your staff for creating a great learning experience that I benefit from every day.
Network Administrator, Mondial Assistance
I used the tools he demonstrated and those tools saved me a lot of time and money.
Senior Network Engineer, County of Orange, CA
After hearing Jeremy speak, I was immediately able to confidently use GPMC, and successfully deploy many GPO’s which have saved my sanity and added years to my life. Having a copy of Jeremy’s Group Policy, Profiles, and IntelliMirror book on hand has given me instant access to many of those “How does this work in the real world?” questions. Thanks Jeremy, You are awesome!
Lead Systems Administrator
After taking Jeremy’s class, I was able to create and troubleshoot Group Policy in our environment. Others tried to convince me that the “Microsoft Standard” is to have one huge policy, but troubleshooting that policy for them was a nightmare. After they saw how easy it was to create smaller, less complicated policies, troubleshooting became a piece of cake.
Server Administrator, University of Toledo
I was able to apply some of the Group Policy best practices that I had not already implemented. I am also looking forward to implementing the many new Vista/W2K8 GPOs.
Sr. Systems Administrator, Adventist Health Systems
I sincerely enjoyed the class in Boston and I learned a lot. Within two work days of coming back I had a major update to a core product piece of software that, because of your class, I knew to ask for an MSI file for the update and how to properly create a GPO to distribute to the appropriate users and make it do an install without interaction or granting them administrator rights. When they logged in this morning the update applied beautifully. This one process alone has made the whole class worth it to me. With the many other things I learned and will also put to use in the near future and I am extremely happy. Thanks again for coming to Boston.
Tech Support Specialist, Fidelity Bank
After listening to Jeremy, I felt much more confident in working with Group Policy and using it for many benefits in our Organization. The book was a great supplement, too.
Manager, IT Operations, Miller-Valentine Group
Jeremy has a way of explaining things that are down to earth. He takes a potentially dry subject and makes it more fun. These Group Policy courses are invaluable to help me in my job. As we transition to new machines and new operating systems, I can use the information and tools learned in class immediately. The pre-built virtual lab machines made it so I could focus on the labs right away. The hands-on labs are awesome! I am really glad I signed up for Jeremy’s online courses–even though I ended up taking them on my own after work. It was a really good investment.
ATK Launch Systems
